


Welcome to the ultimate Headscale tutorial: your comprehensive guide to mastering the innovative Headscale platform. In today’s digital networking landscape, the emergence of open-source projects like Headscale has marked a new era in remote connectivity and network security. This guide simplifies remote access and enhances security, without the complexity of exposing ports to the internet. Dive into the steps of setting up Headscale and unlock the potential of a more private, decentralized network.
What is Tailscale?#
Tailscale is a virtual networking tool based on WireGuard, similar in nature to Netmaker. Its unique feature is that Tailscale operates WireGuard protocol in user mode, unlike Netmaker’s kernel mode implementation. This results in a slight performance decrease for Tailscale compared to kernel mode WireGuard, but it still significantly outperforms alternatives like OpenVPN. Tailscale has made some trade-offs in performance, but it shines in terms of features and ease of use:
- Ready to go right out of the box
- No firewall setup required
- Zero additional configurations
- Emphasizes high security and privacy
- Features automatic key rotation
- Facilitates peer-to-peer connections
- Enables user audits of comprehensive access logs
- Expands beyond ICE, STUN, and other UDP protocols by adding DERP TCP protocol for efficient NAT traversal
- Utilizes a public network control server for disseminating ACLs and configurations, allowing for dynamic updates of nodes
- Leverages third-party SSO services like Google for generating users and private keys, ensuring robust identity authentication
To put it simply, Tailscale can be regarded as an easier to use, feature-enriched alternative to WireGuard.
Moreover, for those who prioritize free and open-source solutions, Tailscale stands out. While it is a commercial product, it offers a free tier for individual users. This allows personal users to use the service without cost for up to 20 devices, albeit with some limitations like non-customizable subnet segments and a single subnet restriction. Apart from the graphical clients for Windows and macOS, the rest of Tailscale’s client components, including the Android client, are developed as open-source projects under the BSD license, as seen in their GitHub repository.
For most individuals, Tailscale’s free version will suffice. Those with more advanced needs, such as the desire to customize network segments, have the option of a paid subscription.
Is it necessary to pay? No, but the details are worth noting.
What is Headscale?#
Headscale is a unique open-source alternative to Tailscale’s control server, which, being proprietary, places several restrictions on free users as a part of its revenue model. Created by Juan Font from the European Space Agency and programmed in Go, Headscale is available under the BSD license. It effectively mirrors the main features of Tailscale’s control server, allowing organizations to deploy it internally without restrictions on the number of devices, thus ensuring complete control over their network traffic.

Setting Up Headscale#
Simplified Deployment via Sealos#
For those seeking a quick and efficient setup, you can use the Sealos application template for a one-click deployment. This method is user-friendly and doesn’t require complex configurations.
Just click on the button below to be redirected to the Sealos prebuilt template deployment page:

Note: New users to Sealos must register and log in to proceed.
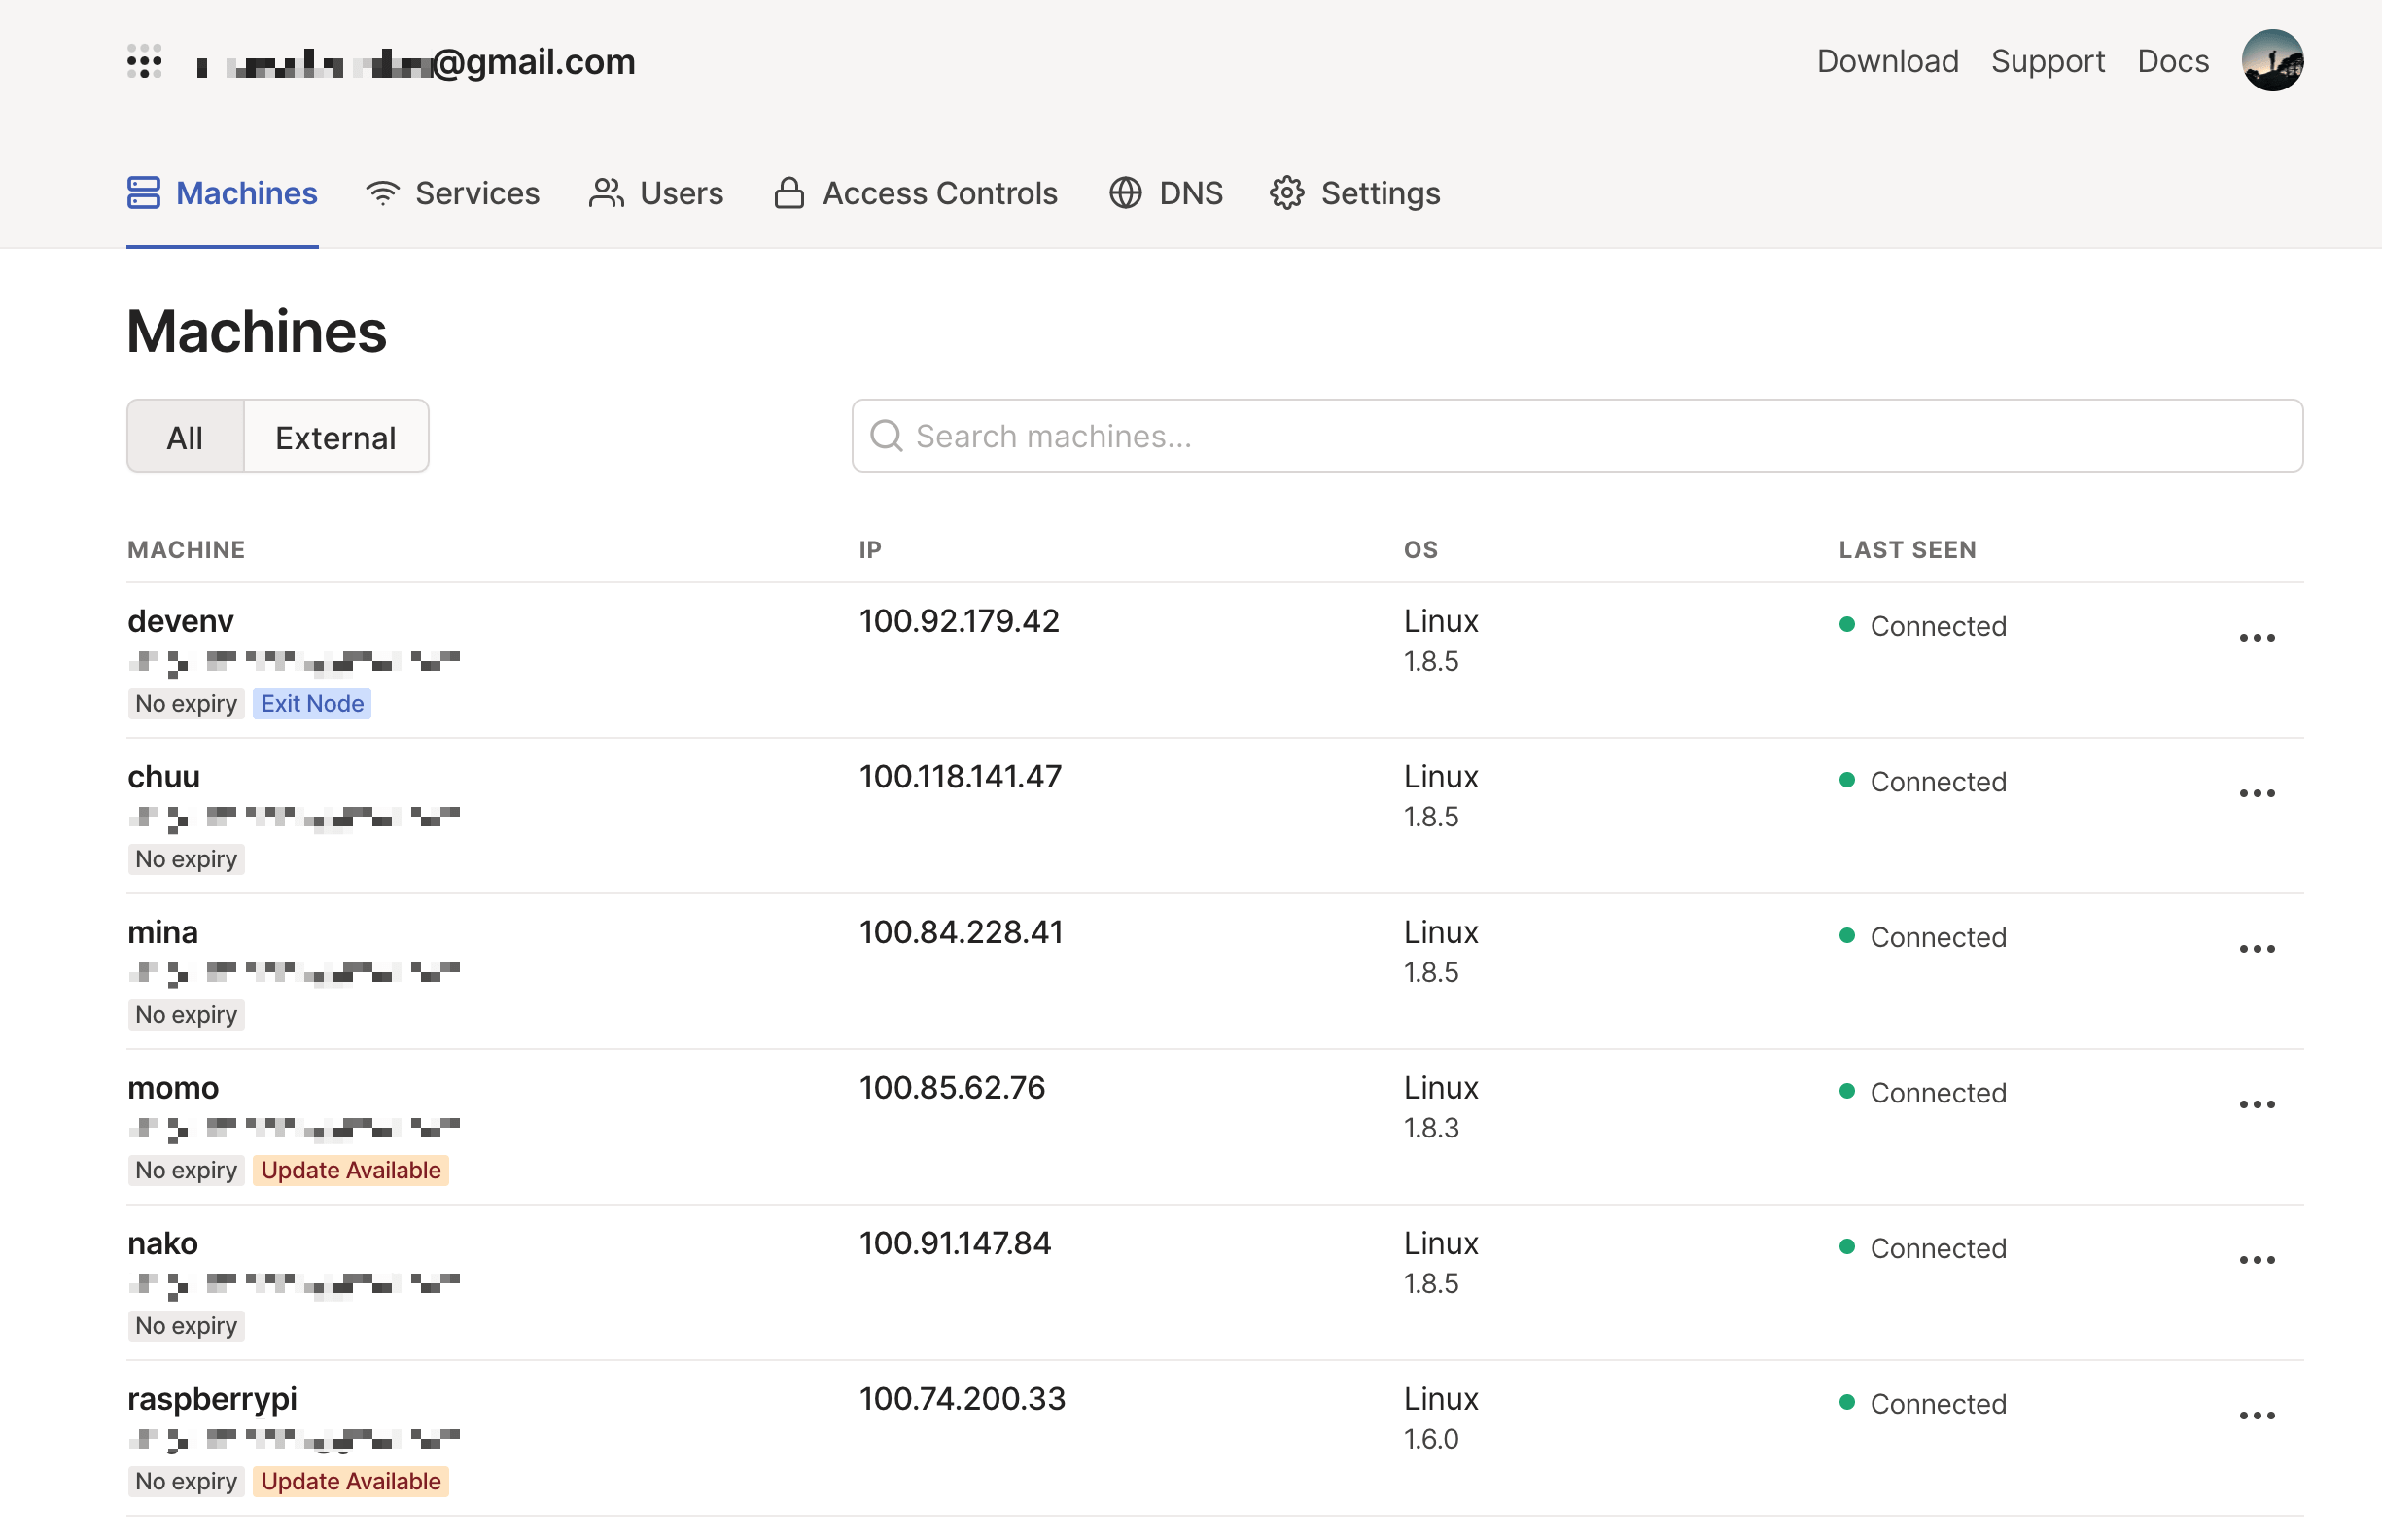
After clicking the ‘Deploy Application’ button, the deployment starts. Upon completion, two applications appear: Headscale, and its visual interface.
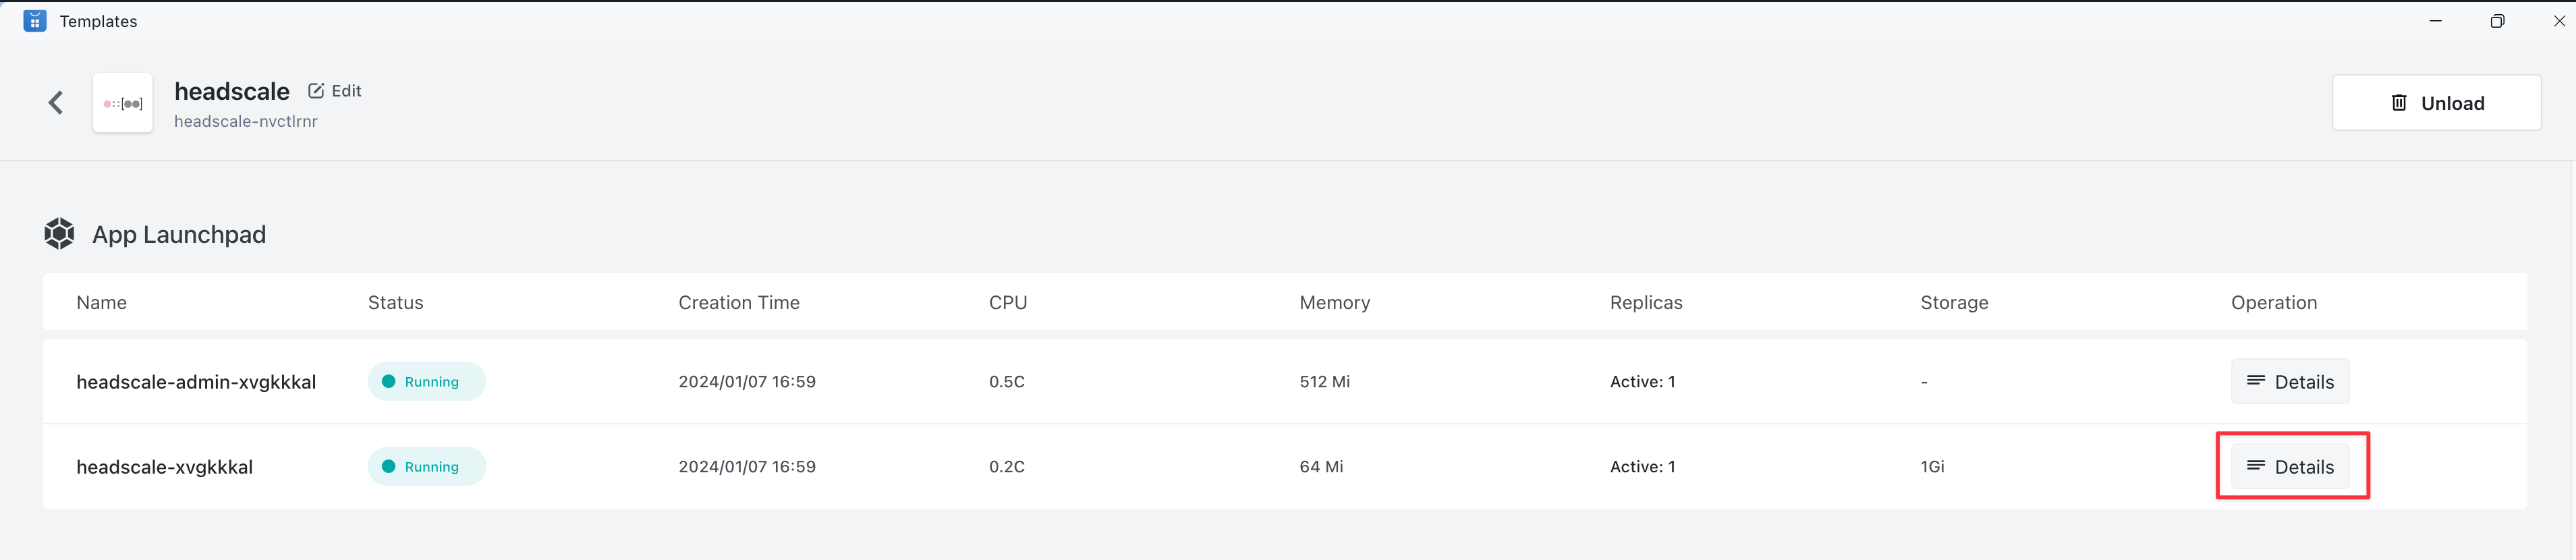
For details, click ‘Details’ on the Headscale application page. The Public Address associated with the internal port 8080 is the public URL for Headscale.
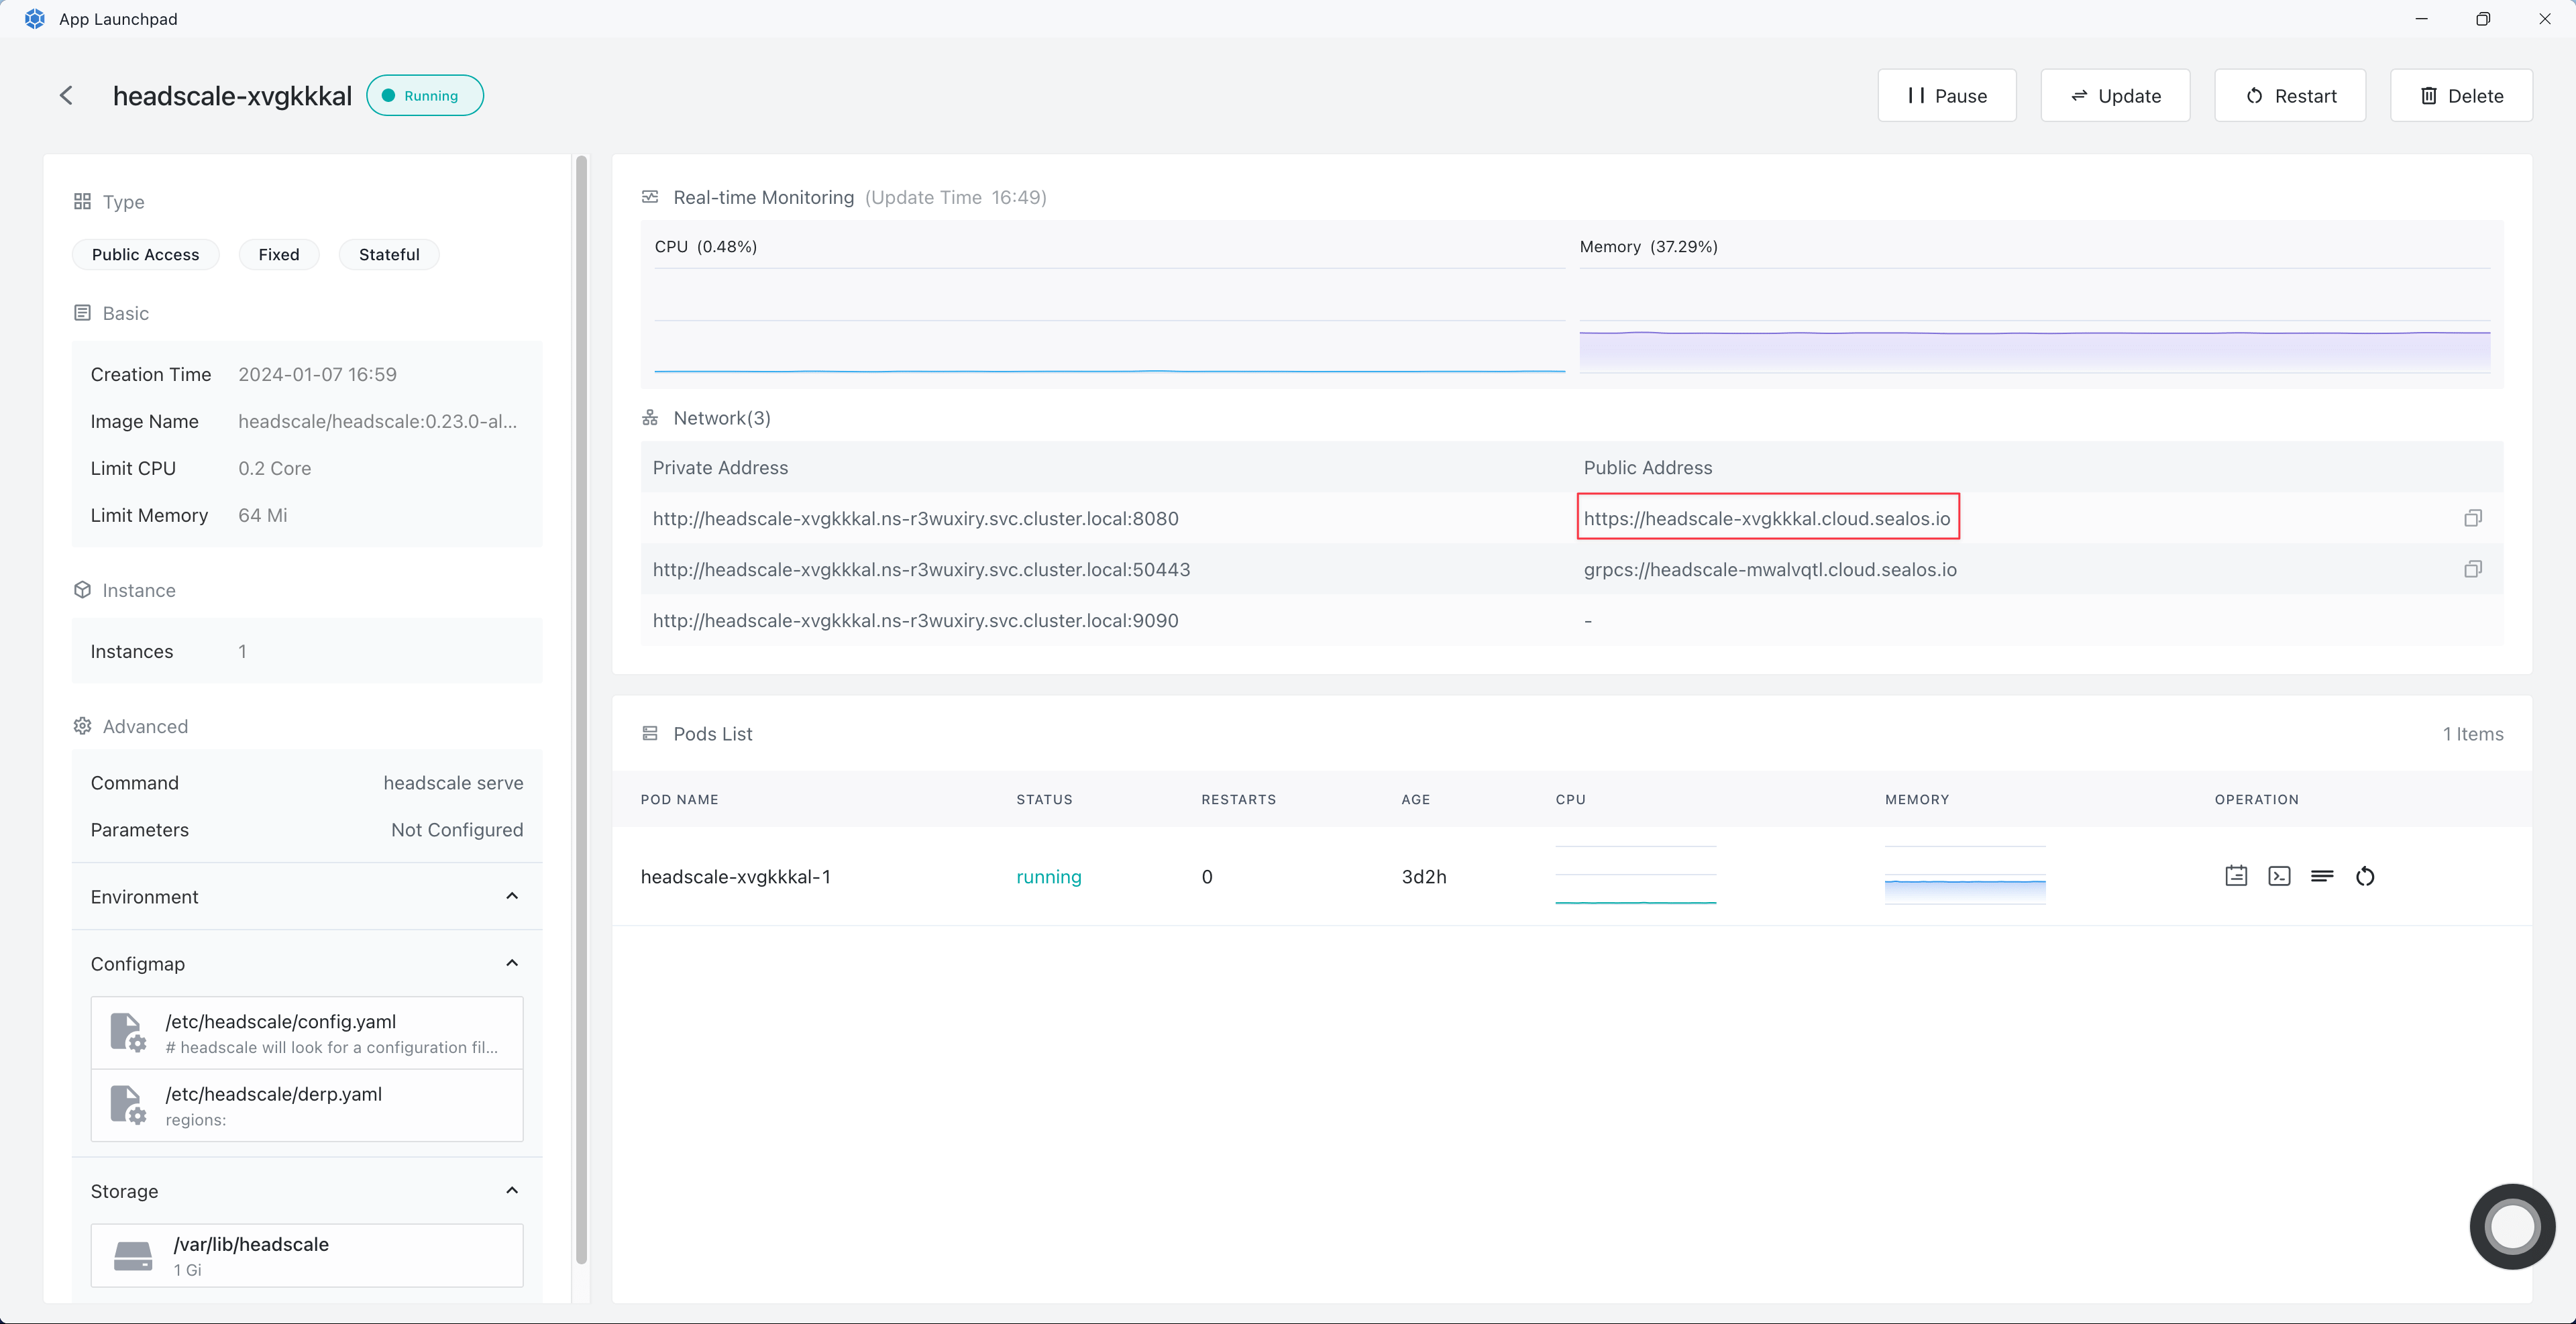
To access the Headscale visual interface, simply append /admin/ to the Headscale public URL.

Deploying on Linux#
Deploying Headscale on Linux is straightforward.
Theoretically, as long as your Headscale service can be exposed to the public network, it should work. However, it’s best to avoid NAT, so deploying Headscale on a cloud host with a public IP is recommended.
First, you need to download the latest binary file from the Release page of its GitHub repository.
$ wget --output-document=/usr/local/bin/headscale \
   https://github.com/juanfont/headscale/releases/download/v<HEADSCALE VERSION>/headscale_<HEADSCALE VERSION>_linux_<ARCH>

$ chmod +x /usr/local/bin/headscale
Create a configuration directory:
$ mkdir -p /etc/headscale
Create directories for storing data and certificates:
$ mkdir -p /var/lib/headscale
Create an empty SQLite database file:
$ touch /var/lib/headscale/db.sqlite
Create the Headscale configuration file:
$ wget https://github.com/juanfont/headscale/raw/main/config-example.yaml -O /etc/headscale/config.yaml
Modify the configuration file, changing
server_urlto your public IP or domain.If you don’t need the DNS function for the time being, you can set
magic_dnsto false.Set
server_urlashttp://<PUBLIC_ENDPOINT>:8080, replacing<PUBLIC_ENDPOINT>with your public IP or domain.It’s advisable to open a random port, set
randomize_client_portto true.You can customize private network segments and enable both IPv4 and IPv6:
ip_prefixes:
  # - fd7a:115c:a1e0::/48
  - 100.64.0.0/16
Create a SystemD service configuration file:
# /etc/systemd/system/headscale.service
[Unit]
Description=headscale controller
After=syslog.target
After=network.target

[Service]
Type=simple
User=headscale
Group=headscale
ExecStart=/usr/local/bin/headscale serve
Restart=always
RestartSec=5

# Optional security enhancements
NoNewPrivileges=yes
PrivateTmp=yes
ProtectSystem=strict
ProtectHome=yes
ReadWritePaths=/var/lib/headscale /var/run/headscale
AmbientCapabilities=CAP_NET_BIND_SERVICE
RuntimeDirectory=headscale

[Install]
WantedBy=multi-user.target
Create a headscale user:
$ useradd headscale -d /home/headscale -m
Change the owner of the /var/lib/headscale directory:
$ chown -R headscale:headscale /var/lib/headscale
Modify the unix_socket in the configuration file:
unix_socket: /var/run/headscale/headscale.sock
Reload SystemD to load the new configuration files:
$ systemctl daemon-reload
Start the Headscale service and set it to start on boot:
$ systemctl enable --now headscale
Check the running status:
$ systemctl status headscale
Check the occupied ports:
$ ss -tulnp|grep headscale

tcp LISTEN 0 1024 [::]:9090 [::]:* users:(("headscale",pi

d=10899,fd=13))

tcp LISTEN 0 1024 [::]:50443 [::]:* users:(("headscale",pi

d=10899,fd=10))

tcp LISTEN 0 1024 [::]:8080 [::]:* users:(("headscale",pi

d=10899,fd=12))
Creating a User Account#
Using the Command Line#
In Tailscale, there’s a feature known as “tailnet,” which essentially functions like a separate tenant, ensuring isolation between different tenants. For a comprehensive understanding, you can refer to Tailscale’s official guide: What is a tailnet. Headscale follows a similar approach with its ‘user’ feature. The first step involves creating a user, which is crucial for enabling client connections. Here’s how:
$ headscale user create default
To view existing users:
$ headscale user list

ID | Name | Created

1 | default | 2022-03-09 06:12:06
For those who have deployed Headscale using Sealos’s streamlined one-click method, you can navigate to the Headscale application’s detail page and click on the “Terminal” button on the right. This action will take you to the Headscale container’s terminal:
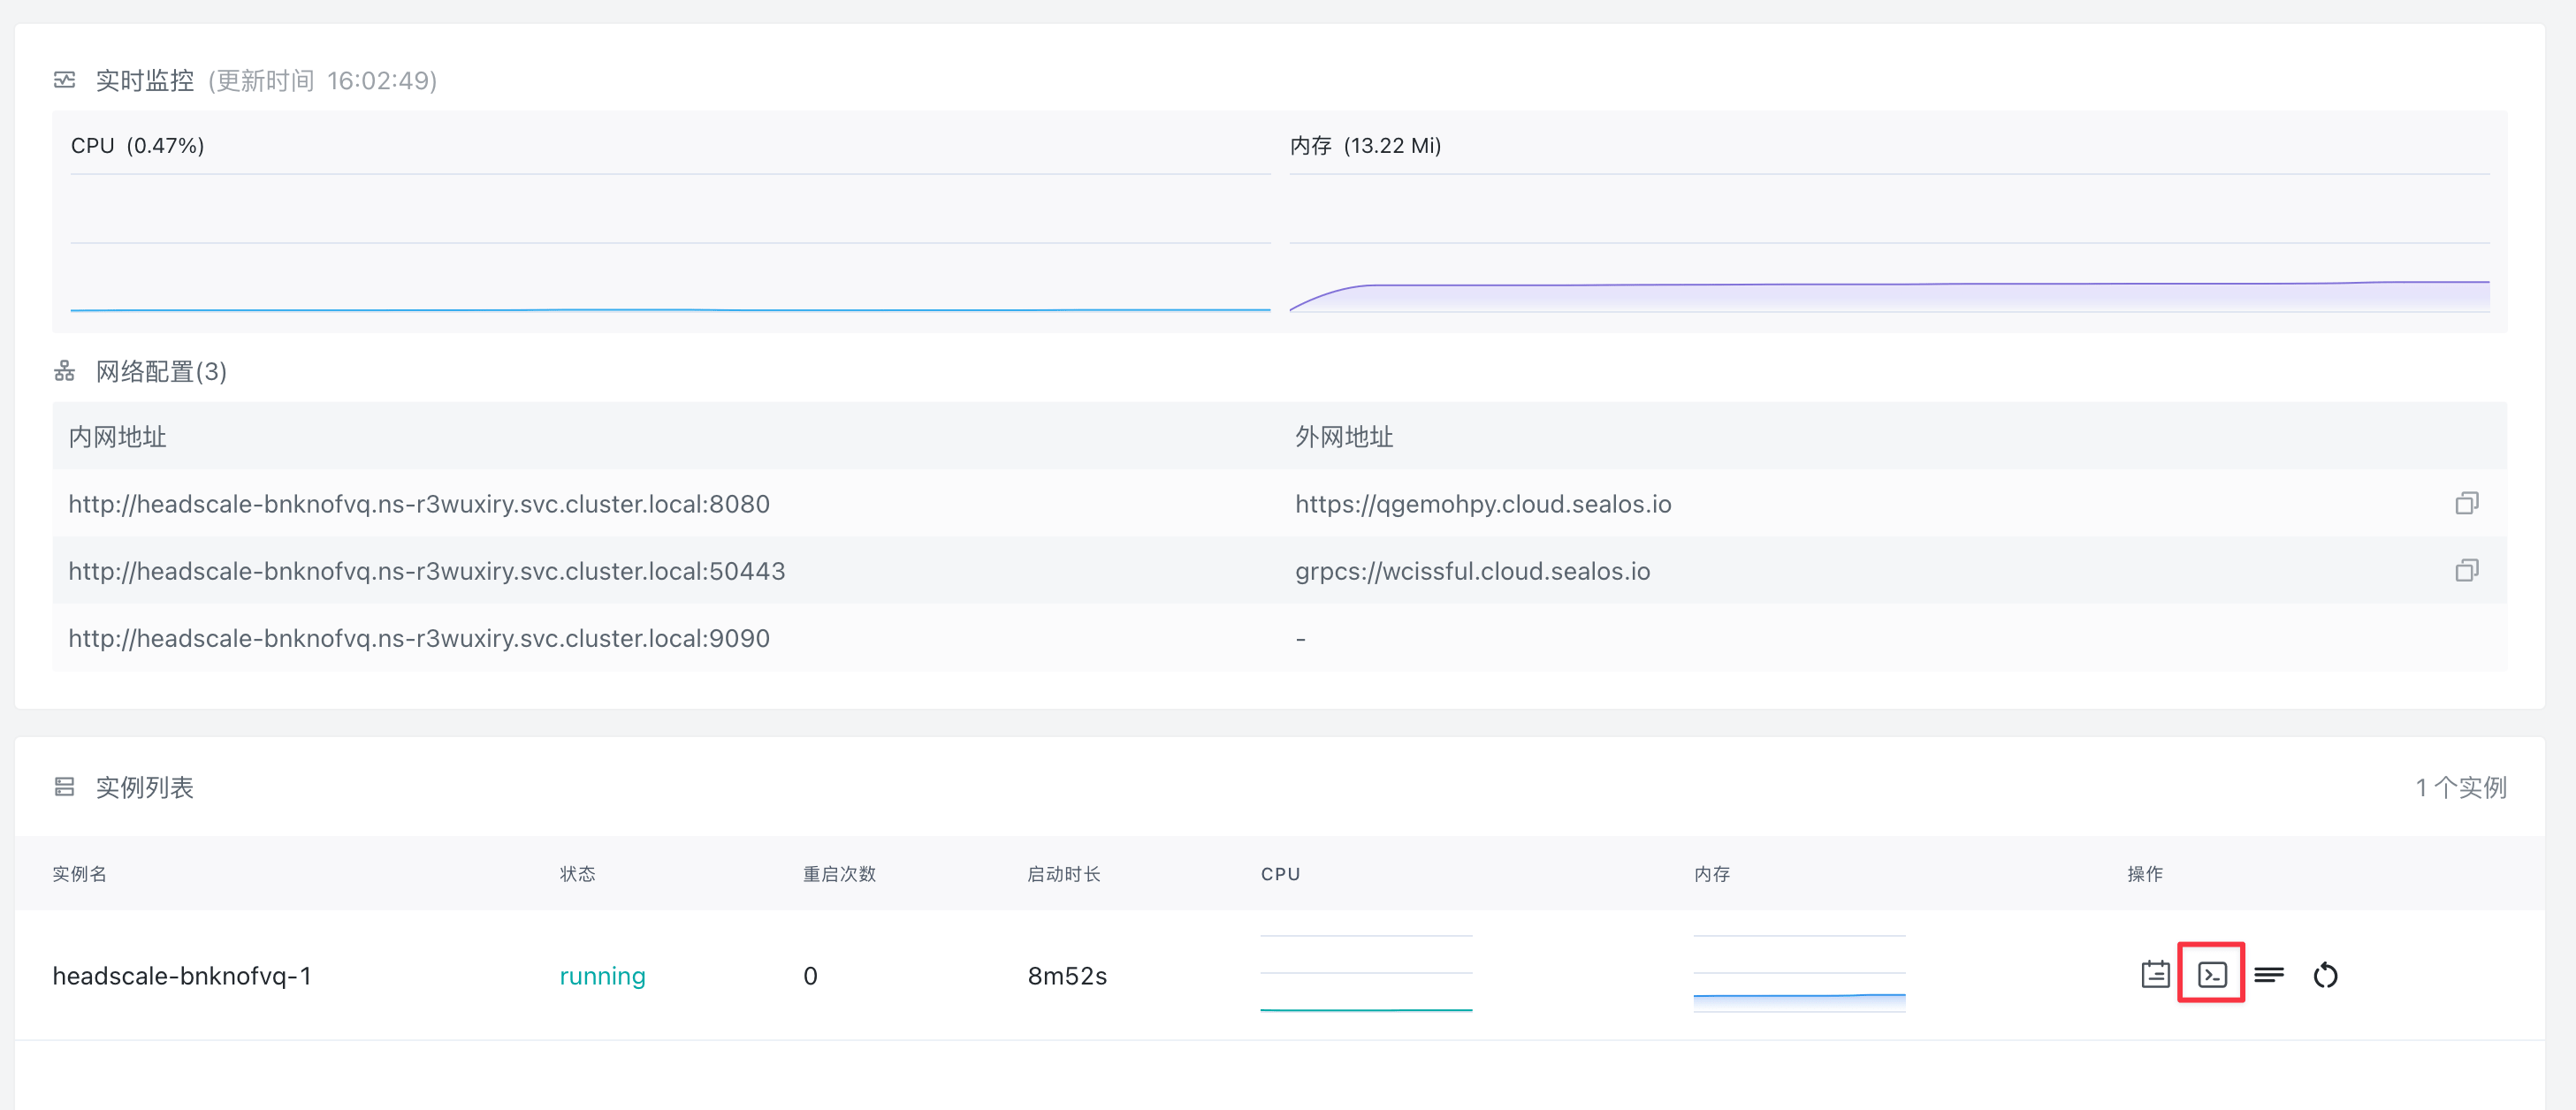
Once in the terminal, you can carry out the above-mentioned steps to set up a user.
Using Dashboard#
To link Headscale-Admin with Headscale, an API Key is essential. Initially, you must create an API key. Go to the Headscale application’s detail page and click the “Terminal” button on the right to enter the Headscale container’s terminal interface:
To create an API Key, execute the following command:
$ headscale apikey create
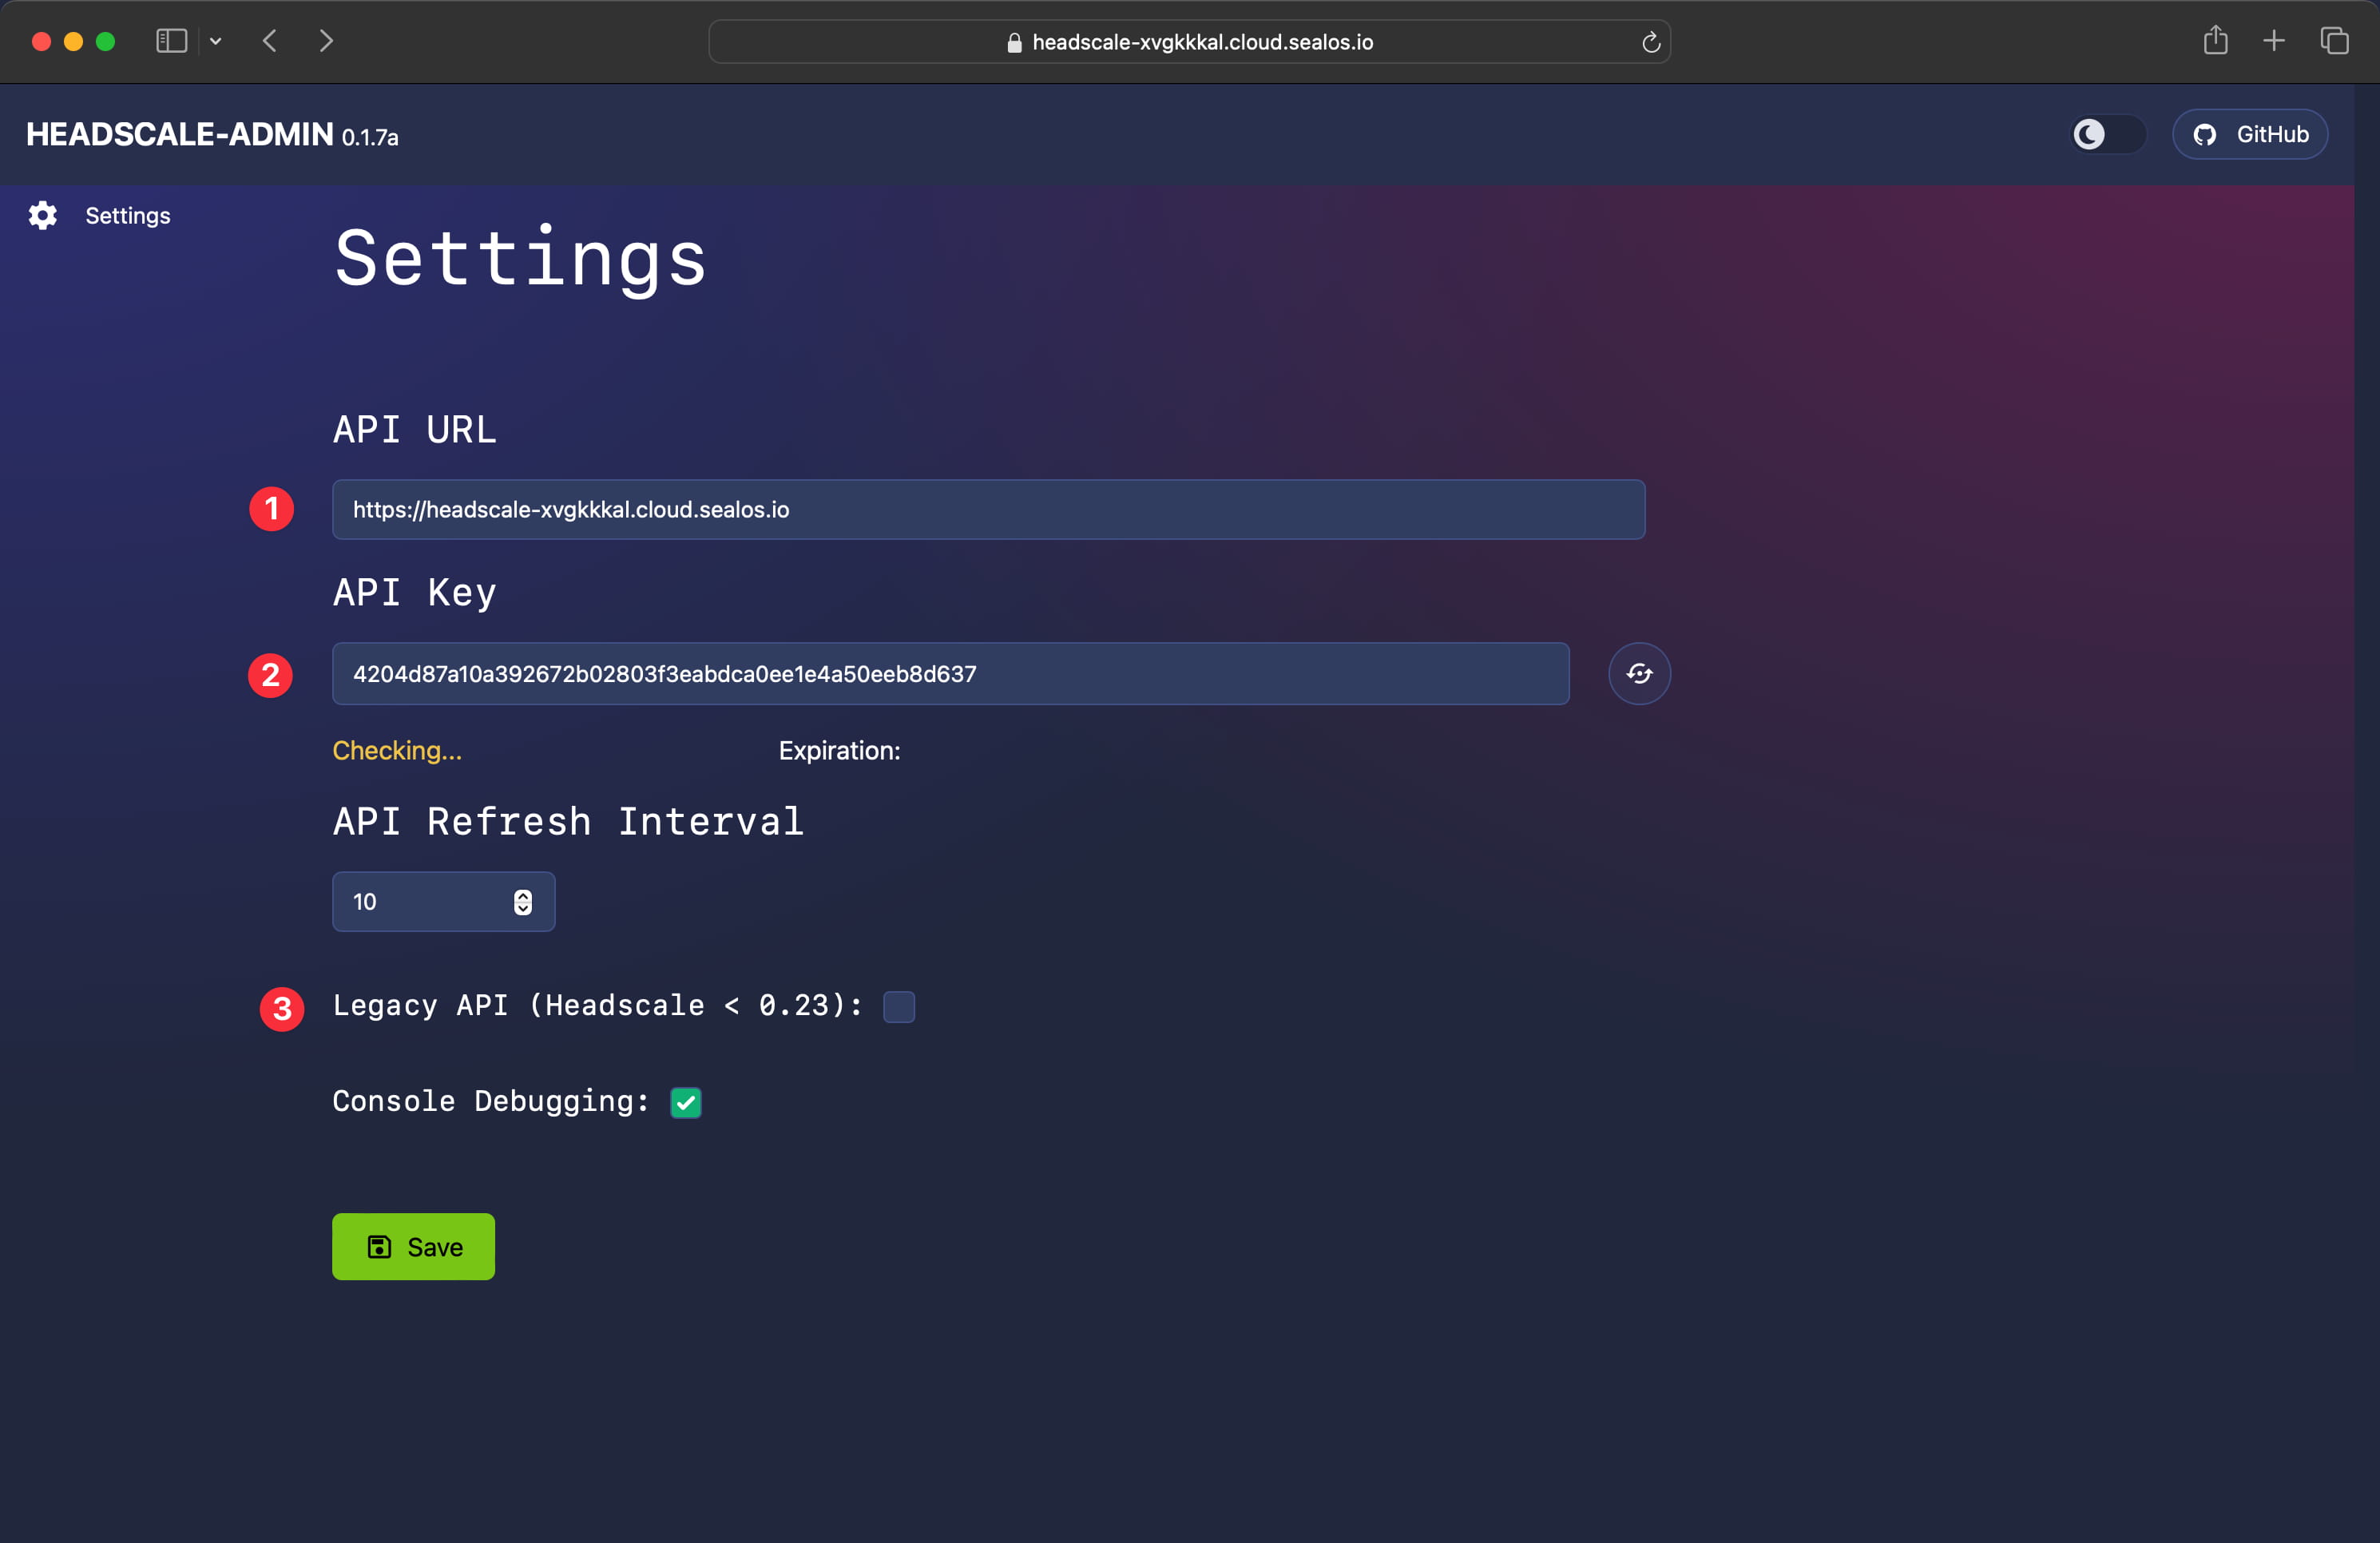
Input the Headscale public domain and API Key into the Headscale-Admin settings. Make sure to uncheck the Legacy API option, then click “Save”:
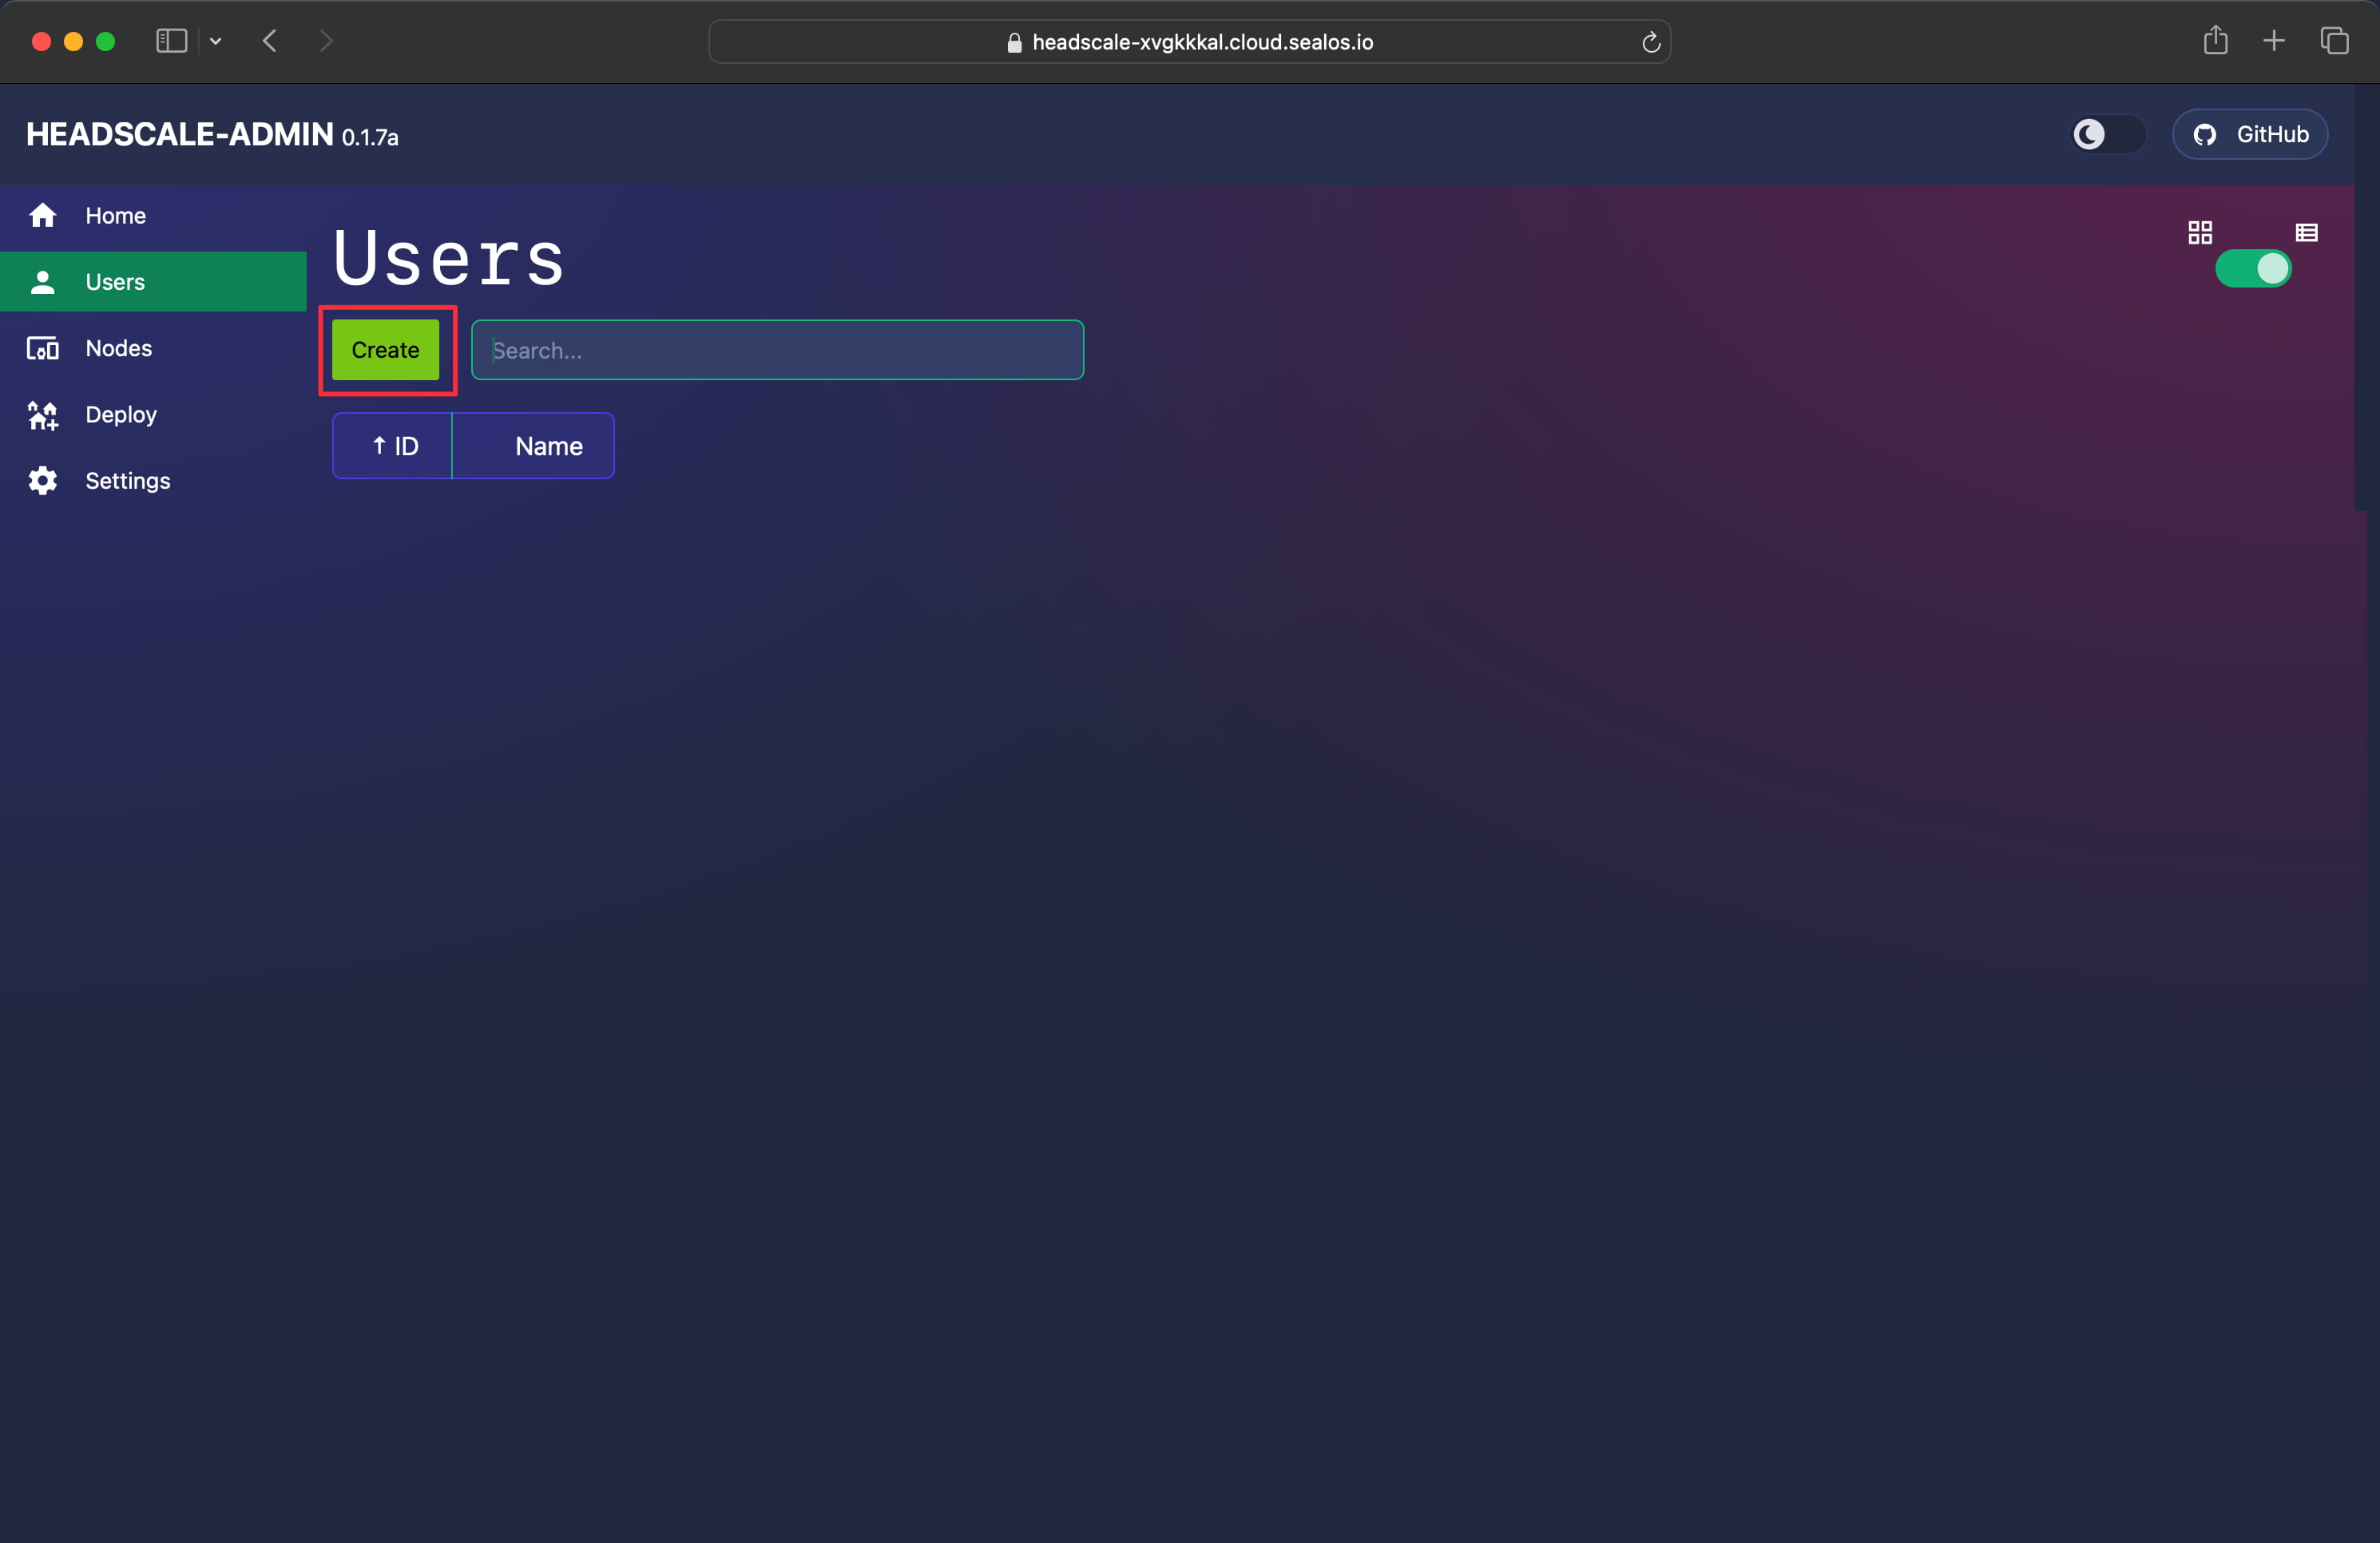
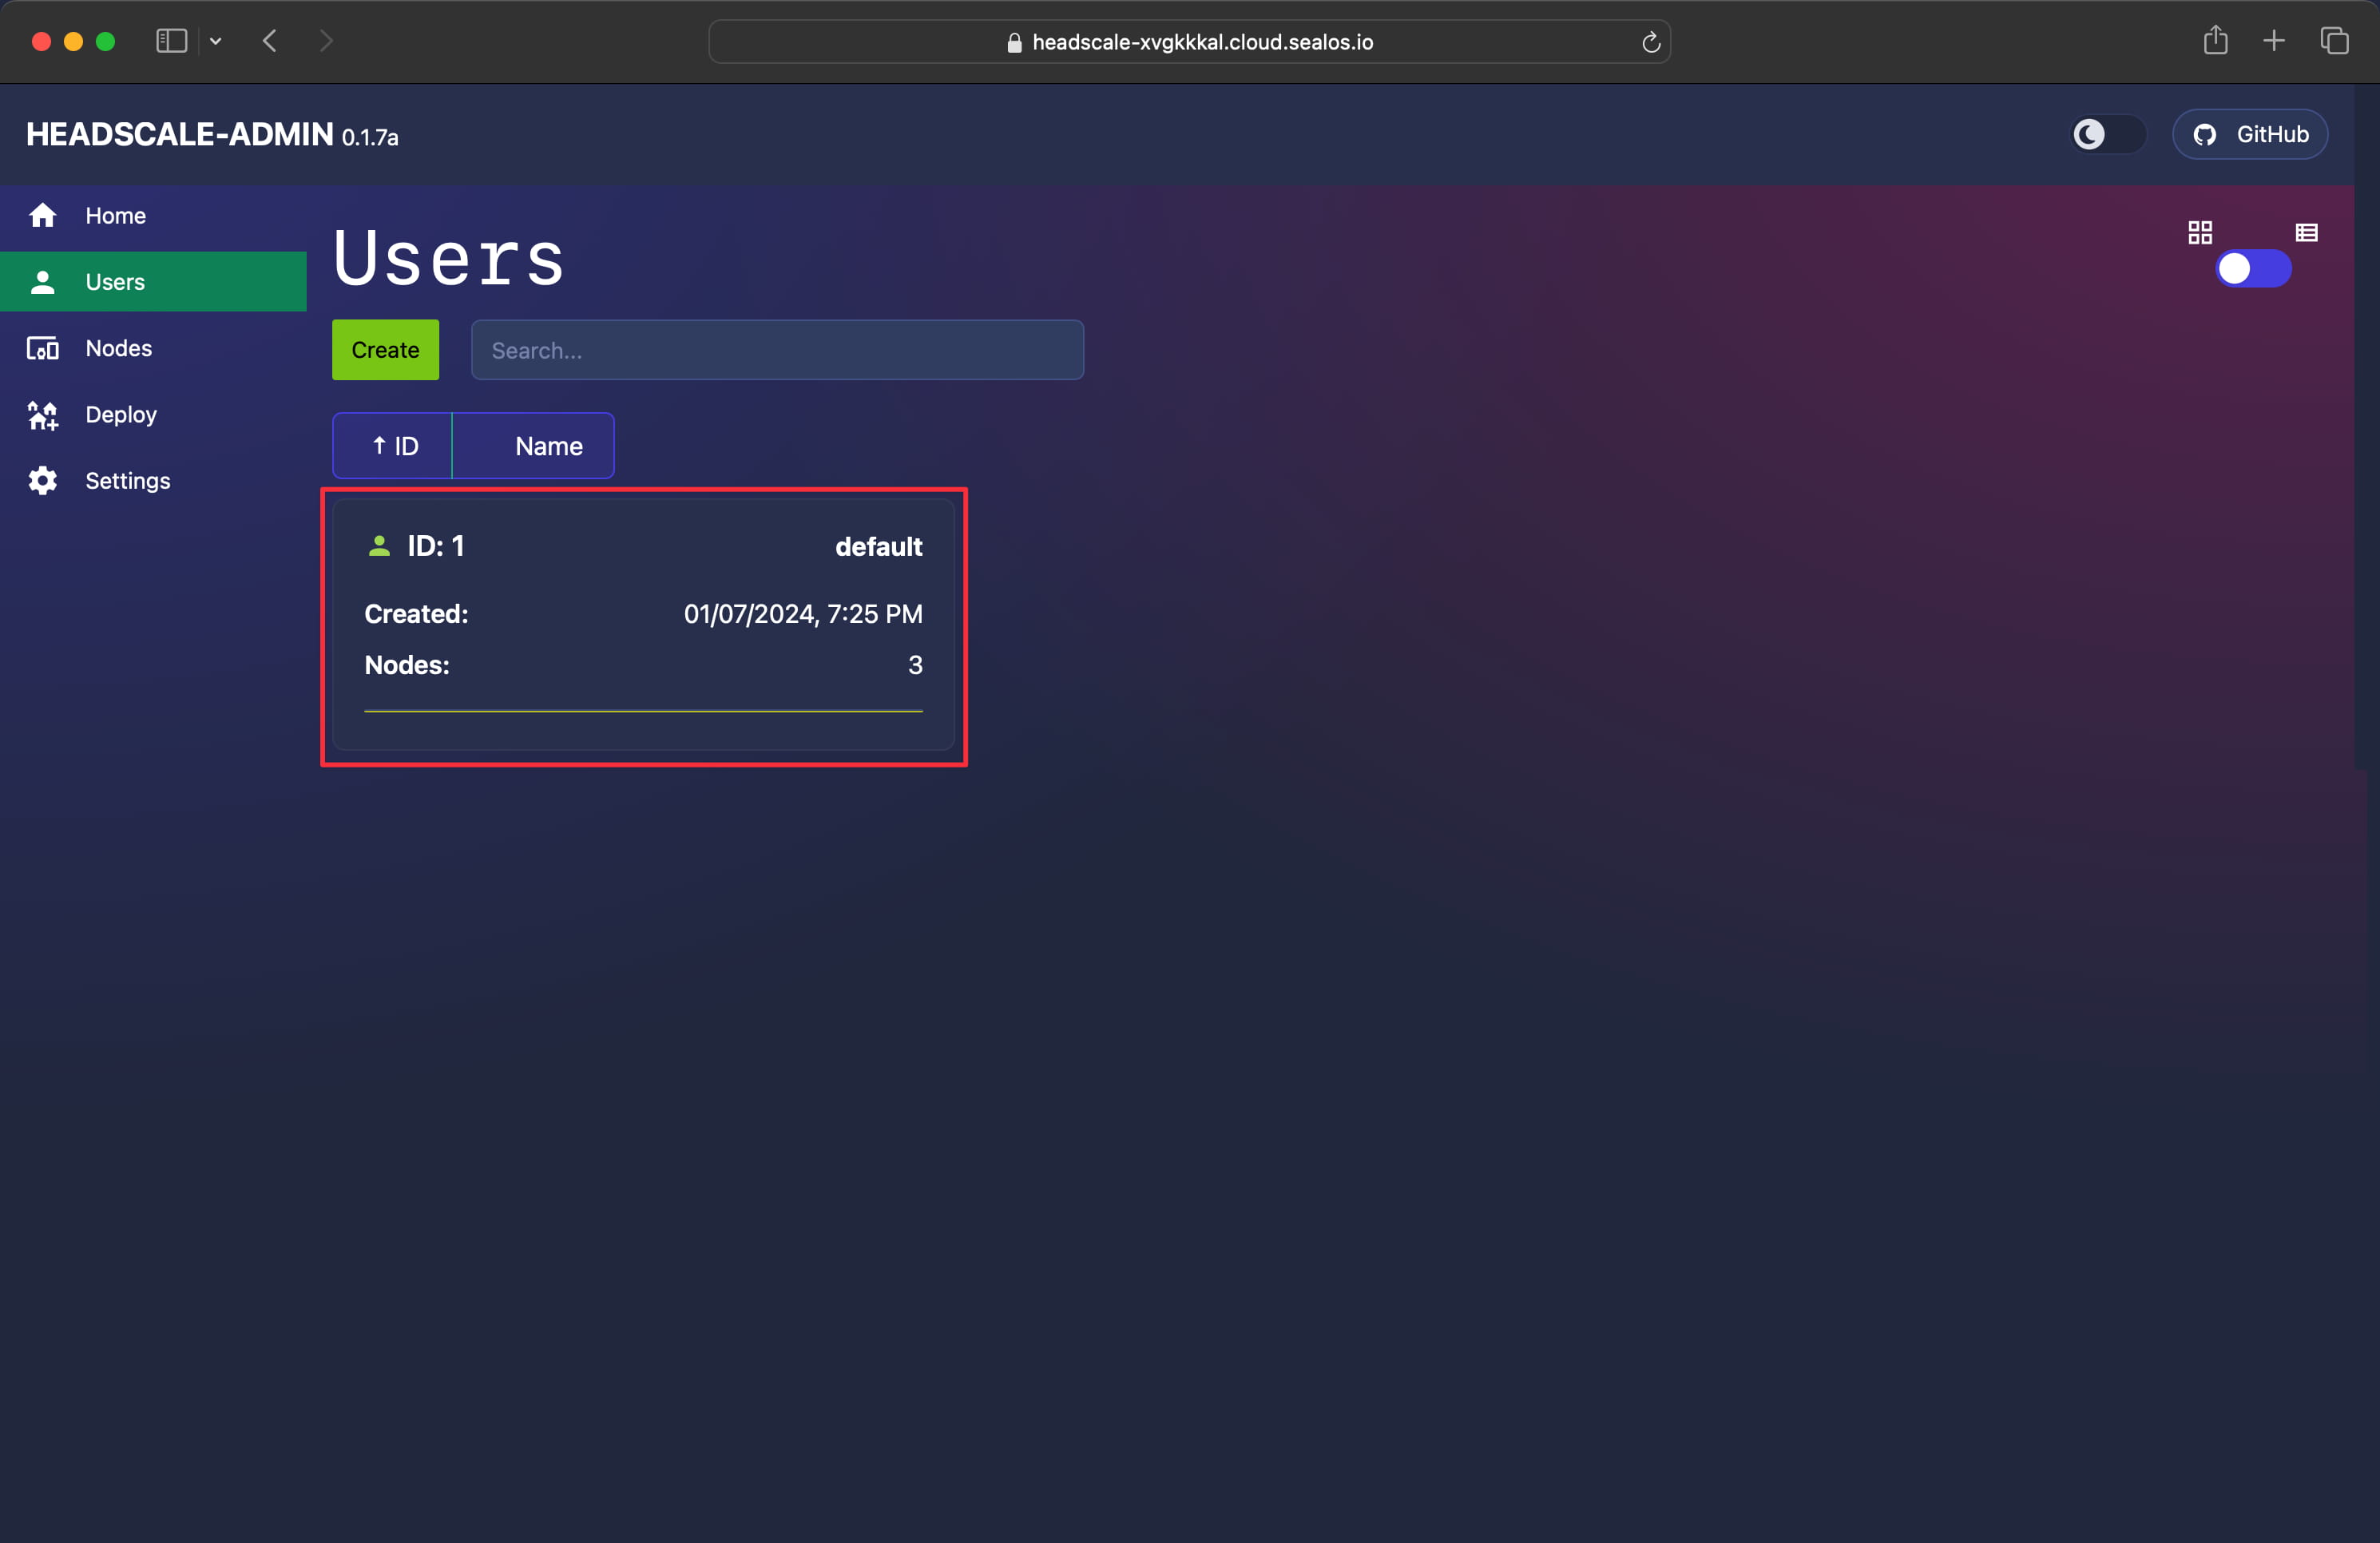
After establishing the connection, navigate to “Users” in the left sidebar, and proceed with “Create” to initiate the user creation process:
Tailscale Client Integration#
For all platforms, it’s possible to customize the control server for Tailscale clients.
| OS | Headscale Support |
|---|---|
| Linux | Yes |
| OpenBSD | Yes |
| FreeBSD | Yes |
| macOS | Yes |
| Windows | Yes, see Windows Client Documentation |
| Android | Yes |
| iOS | Yes |
Let’s delve into the Linux platform integration process.
Linux#
Tailscale offers software packages for various Linux distributions. Due to network limitations in China, these repositories may not be accessible. A workaround is using statically compiled binary files provided by the official site. For example, you can download them as follows:
$ wget https://pkgs.tailscale.com/stable/tailscale_1.22.2_amd64.tgz
Next, proceed to unpack the downloaded file:
$ tar zxvf tailscale_1.22.2_amd64.tgz
x tailscale_1.22.2_amd64/
x tailscale_1.22.2_amd64/tailscale
x tailscale_1.22.2_amd64/tailscaled
x tailscale_1.22.2_amd64/systemd/
x tailscale_1.22.2_amd64/systemd/tailscaled.defaults
x tailscale_1.22.2_amd64/systemd/tailscaled.service
Transfer the binary to the standard location for official packages:
$ cp tailscale_1.22.2_amd64/tailscaled /usr/sbin/tailscaled
$ cp tailscale_1.22.2_amd64/tailscale /usr/bin/tailscale
Move the systemD service configuration file to the appropriate system directory:
$ cp tailscale_1.22.2_amd64/systemd/tailscaled.service /lib/systemd/system/tailscaled.service
Place the environment variable configuration file in the system directory:
$ cp tailscale_1.22.2_amd64/systemd/tailscaled.defaults /etc/default/tailscaled
Activate tailscaled.service and enable it to start on boot:
$ systemctl enable --now tailscaled
To check the status of the service:
$ systemctl status tailscaled
Setting up Tailscale with Headscale:
# If hosting on your own server, replace <HEADSCALE_PUB_ENDPOINT> with your Headscale public IP or domain
$ tailscale up --login-server=http://<HEADSCALE_PUB_ENDPOINT>:8080 --accept-routes=true --accept-dns=false

# For Sealos one-click setup, replace <HEADSCALE_PUB_ENDPOINT> with the public domain provided by Sealos
$ tailscale up --login-server=https://<HEADSCALE_PUB_ENDPOINT> --accept-routes=true --accept-dns=false
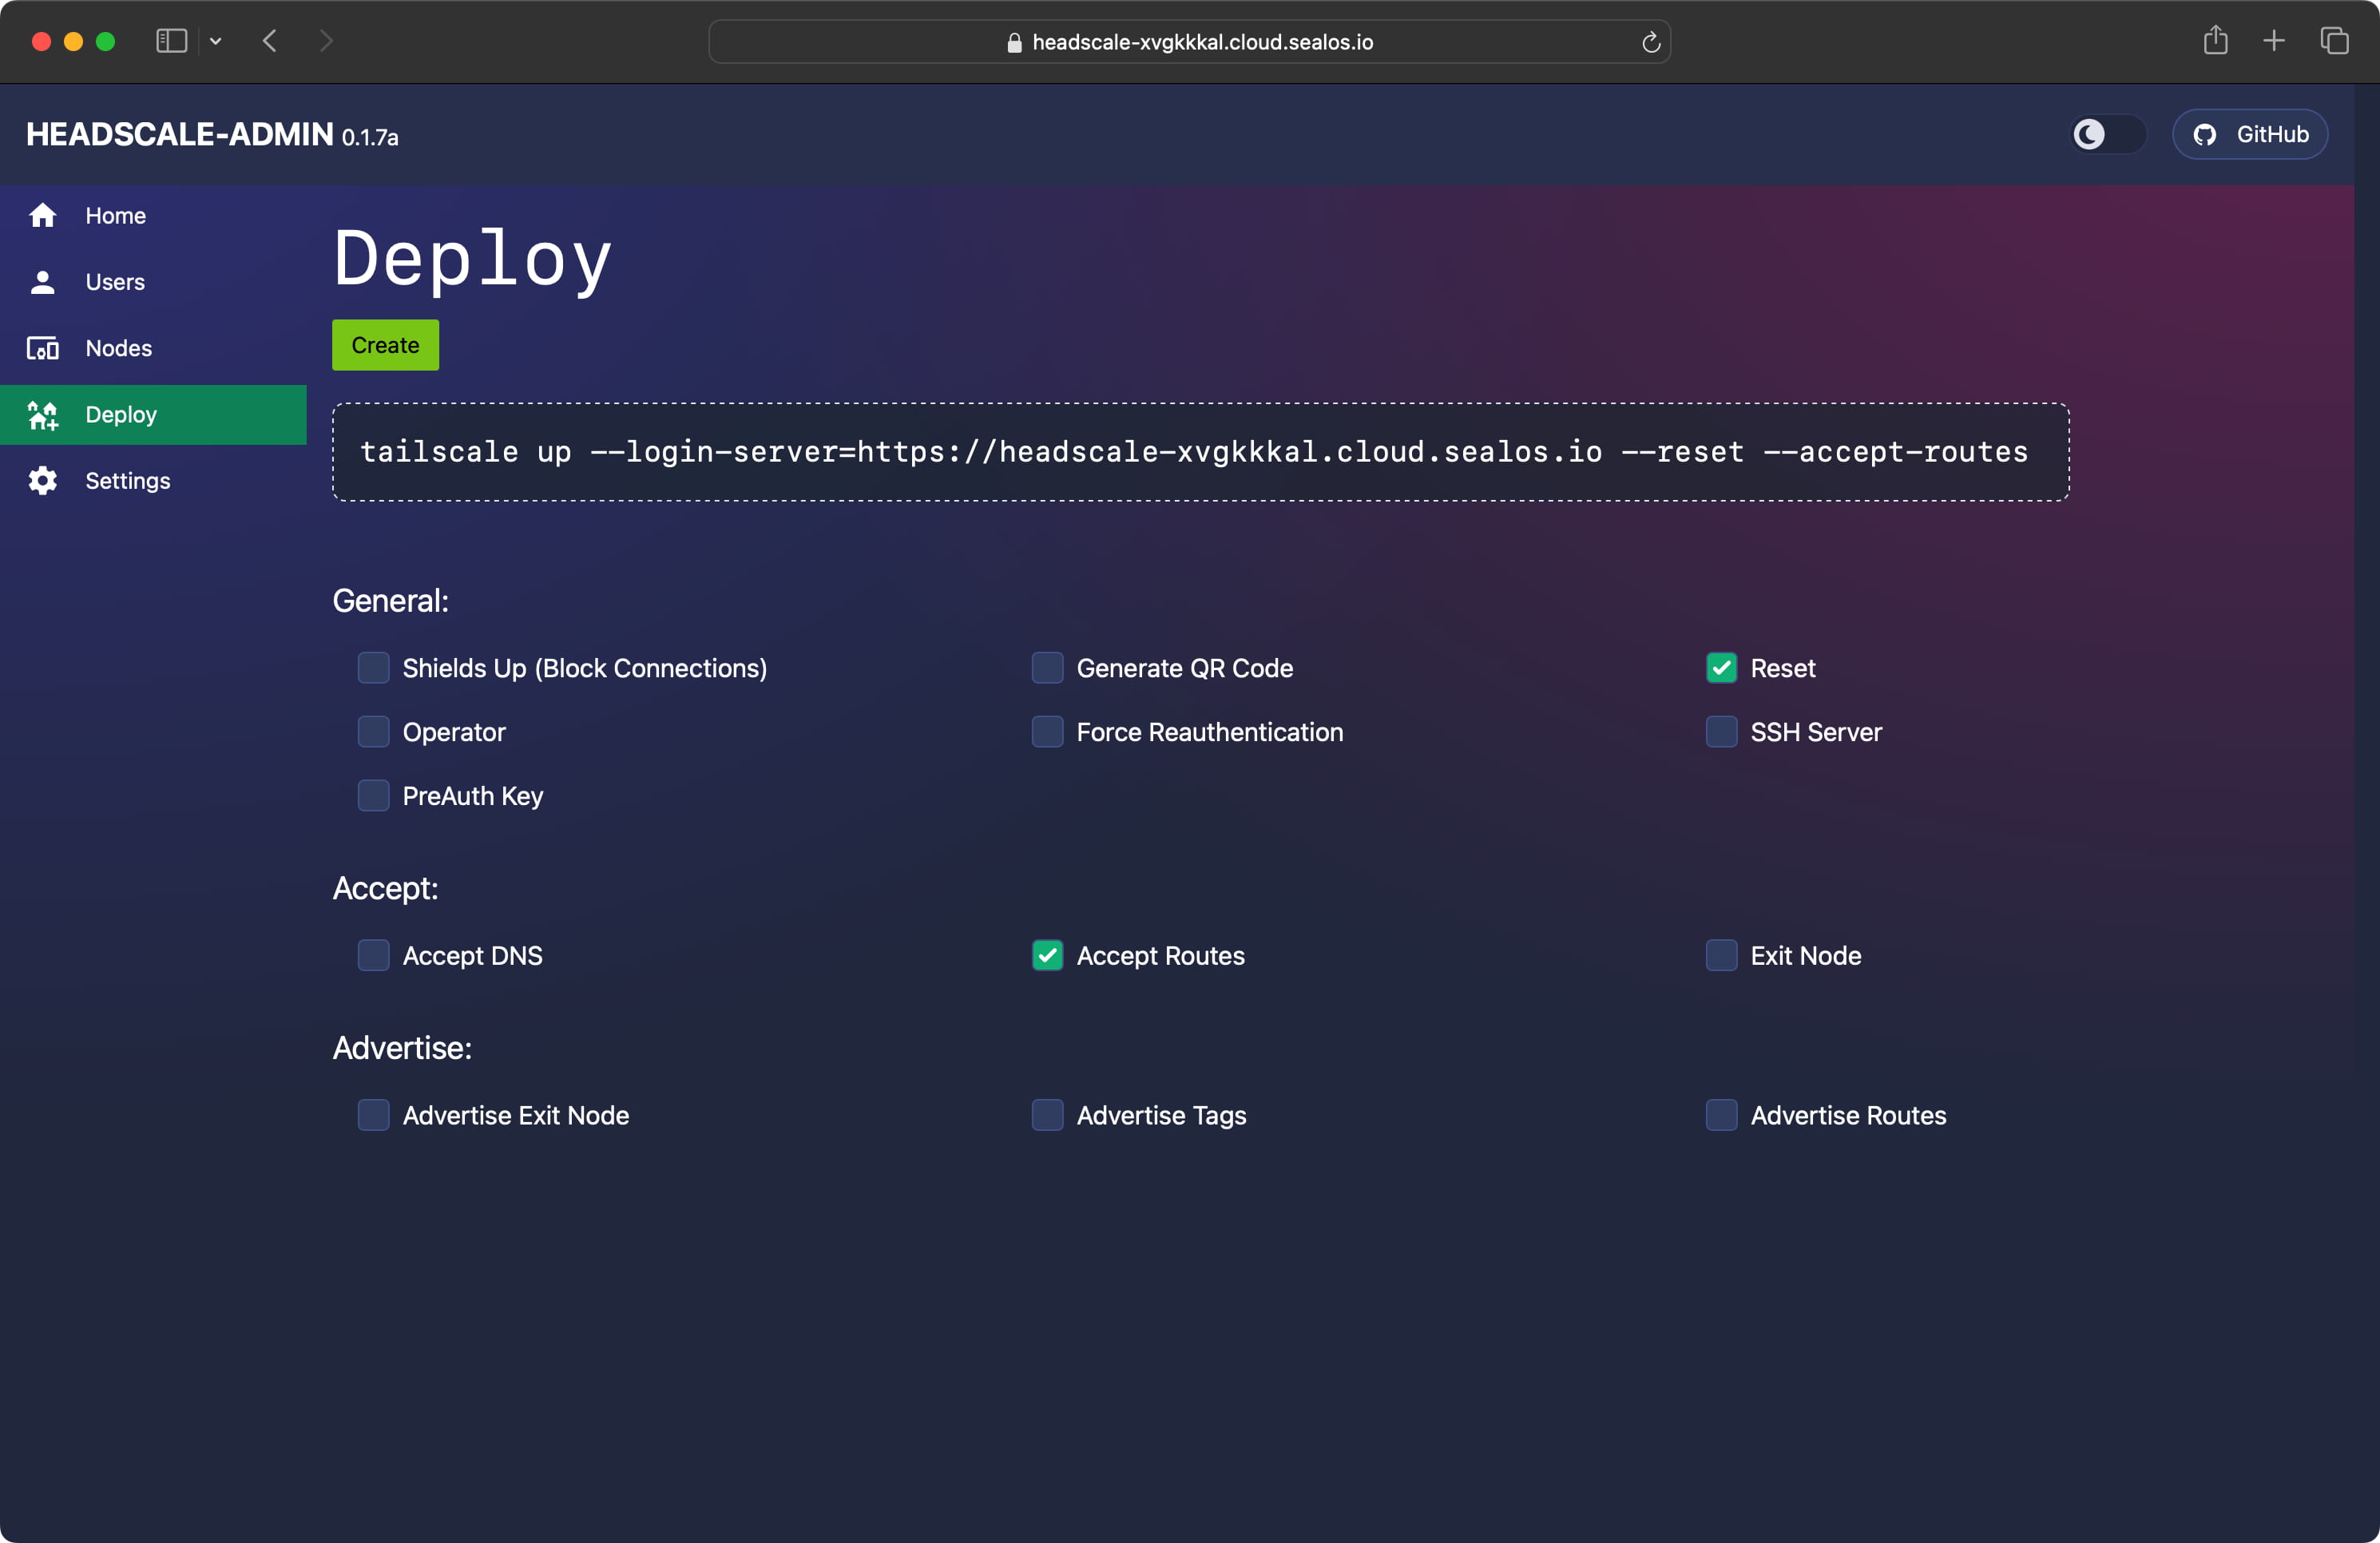
Access commands can also be sourced from the Headsca-Admin Deploy interface:
It is recommended to disable the DNS feature to avoid overriding the default system DNS. For more information on DNS settings, refer to the official Tailscale documentation.
After following these instructions, you will see:
To authenticate, visit:

	https://qgemohpy.cloud.sealos.io/register/mkey:e13651ddbfc269513723f1afd6f42465e56922b67ecea8f37d61a35b1b357e0c
To complete the setup, open the provided link in a browser, and you’ll see this interface:

Copy the command from this interface to the terminal of your headscale server, replacing USERNAME with the user you previously created.
$ headscale nodes register --user default --key 905cf165204800247fbd33989dbc22be95c987286c45aac3033937041150d846
Machine register
Once registered successfully, to view the registered nodes:
$ headscale nodes list

ID | Name | NodeKey | Namespace | IP addresses | Ephemeral | Last seen | Onlin

e | Expired

1 | coredns | [Ew3RB] | default | 100.64.0.1 | false | 2022-03-20 09:08:58 | onlin

e | no
Returning to the Linux machine with the Tailscale client, observe that Tailscale automatically sets up the necessary route tables and iptables rules. To view the route table:
$ ip route show table 52
To examine the iptables rules:
$ iptables -S
-P INPUT DROP
-P FORWARD ACCEPT
-P OUTPUT ACCEPT
-N ts-forward
-N ts-input
-A INPUT -j ts-input
-A FORWARD -j ts-forward
-A ts-forward -i tailscale0 -j MARK --set-xmark 0x40000/0xffffffff
-A ts-forward -m mark --mark 0x40000 -j ACCEPT
-A ts-forward -s 100.64.0.0/10 -o tailscale0 -j DROP
-A ts-forward -o tailscale0 -j ACCEPT
-A ts-input -s 100.64.0.5/32 -i lo -j ACCEPT
-A ts-input -s 100.115.92.0/23 ! -i tailscale0 -j RETURN
-A ts-input -s 100.64.0.0/10 ! -i tailscale0 -j DROP

$ iptables -S -t nat
-P PREROUTING ACCEPT
-P INPUT ACCEPT
-P OUTPUT ACCEPT
-P POSTROUTING ACCEPT
-A ts-postrouting -m mark --mark 0x40000 -j MASQUERADE
macOS#
There are three primary methods to install tailscale on macOS:
- Through the App Store, available at https://apps.apple.com/ca/app/tailscale/id1475387142, requiring a U.S. region ID.
- By downloading and installing the package directly, bypassing the App Store.
- By installing the open-source command-line tools
tailscaleandtailscaled, detailed at https://github.com/tailscale/tailscale/wiki/Tailscaled-on-macOS.
The core data processing in all three methods is identical, with differences only in packaging and system interaction.
Apps from the App Store are run in an application sandbox, isolating them from the rest of the system. These sandboxed apps can act as a network extension, enabling VPN or similar functions, which are not possible for non-App Store apps.
Starting with macOS 10.15, system extensions, which are user-space kernel extensions offering enhanced features like content filtering, were introduced. The Tailscale package not affiliated with the App Store uses these system extensions, distributed via DMG or zip files.
The command-line tools use the utun interface instead of network or system extensions. They lack some functionalities of the GUI version, such as MagicDNS and Taildrop.
Overview:
| App Store (Network Extension) | Independent Application (System Extension) | Command Line Version | |
|---|---|---|---|
| Available | yes | yes, beta | yes |
| Graphical Interface | yes | yes | no; CLI only |
| Minimum macOS Version | macOS 10.13 | macOS 10.15 | macOS 10.13 |
| Background Operation | no; sandboxed | Supported in theory; not yet functional | yes |
| Keychain Access 🔑 | User level | System level | Stored in files |
| Sandbox Isolation | yes | no | no |
| Auto Updates | yes; through the App Store | yes; via Sparkle | no |
| Open Source | no | no | yes |
| MagicDNS | yes | yes | yes |
| Taildrop | yes | yes | Not implemented |
When you’ve installed the GUI version of an application, additional steps are required to use Headscale as the control server for Tailscale. Headscale conveniently provides detailed instructions for this. First, access the URL https://<HEADSCALE_PUB_ENDPOINT>/apple in a web browser, where you will be greeted with the interface shown below:
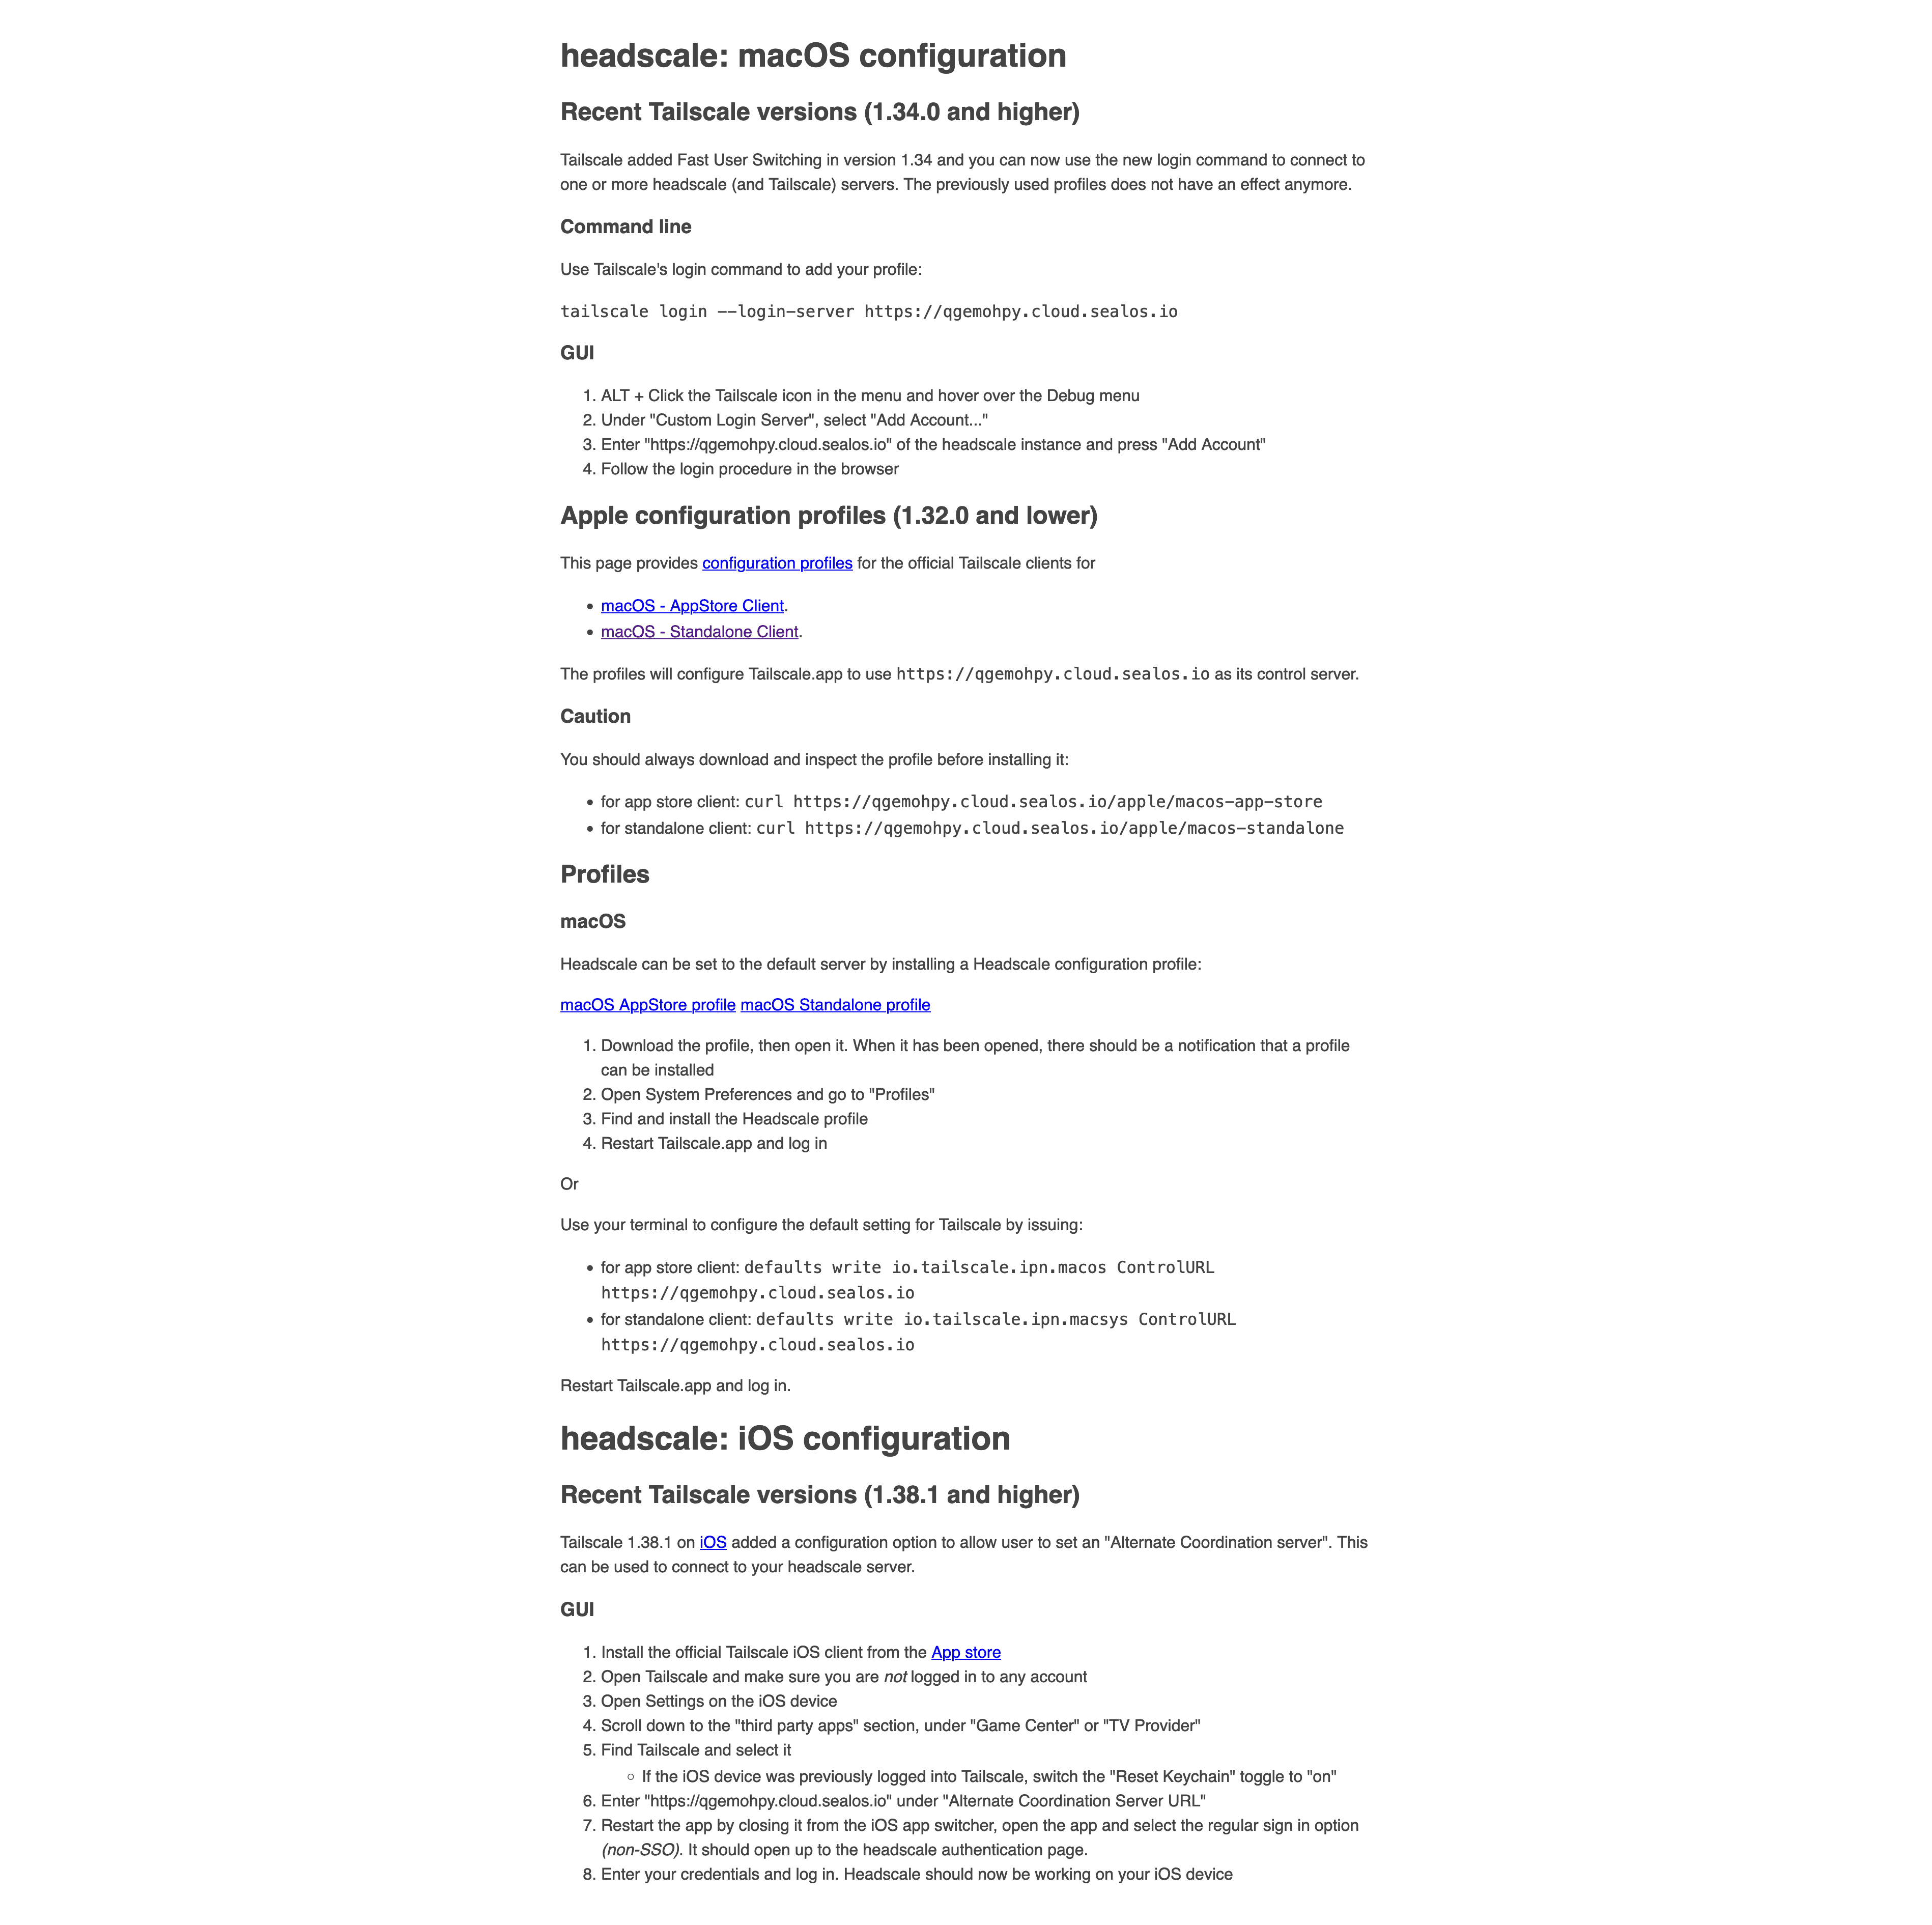
For those using Tailscale version 1.34.0 or newer, the following method applies:
Hold down the ‘ALT’ key and click the Tailscale icon on the top menu bar, then hover the cursor over the ‘Debug’ menu.
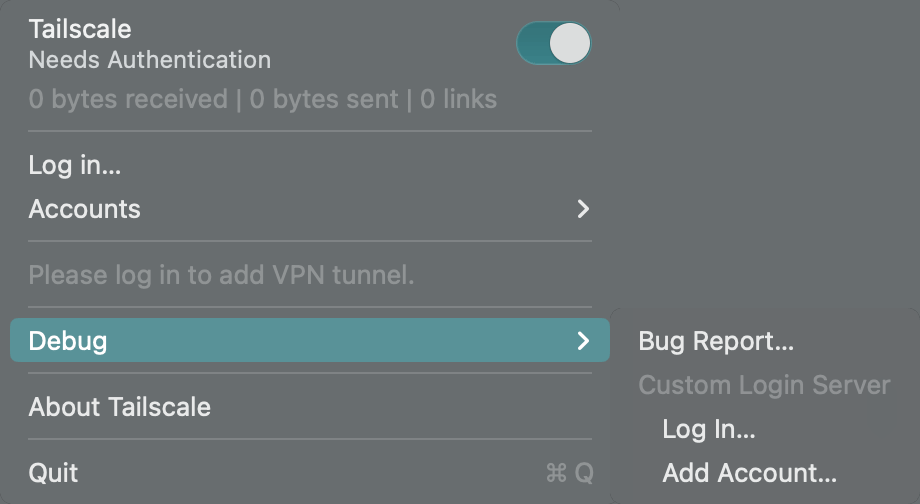
Select ‘Add Account…’ under ‘Custom Login Server’.
In the subsequent window, input the public domain of Headscale and click ‘Add Account’.
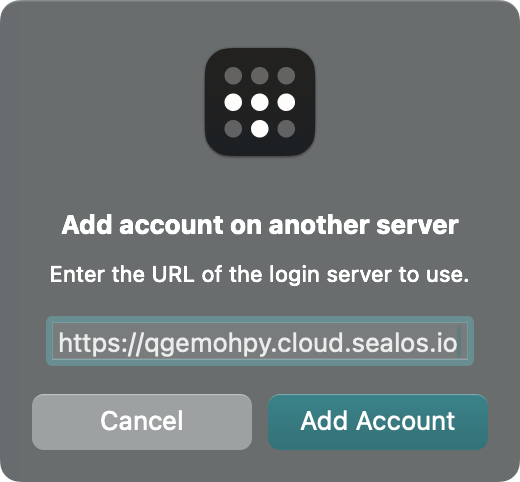
This will redirect you to a webpage in the browser.

As with the Linux client, return to the machine where Headscale is installed and run the command displayed on the browser. Registration is then successful:
On the Headscale host machine, verify the registered nodes:
$ headscale nodes list
ID | Name | NodeKey | Namespace | IP addresses | Ephemeral | Last seen | Onlin
e | Expired
1 | coredns | [Ew3RB] | default | 100.64.0.1 | false | 2022-03-20 09:08:58 | onlin
e | no
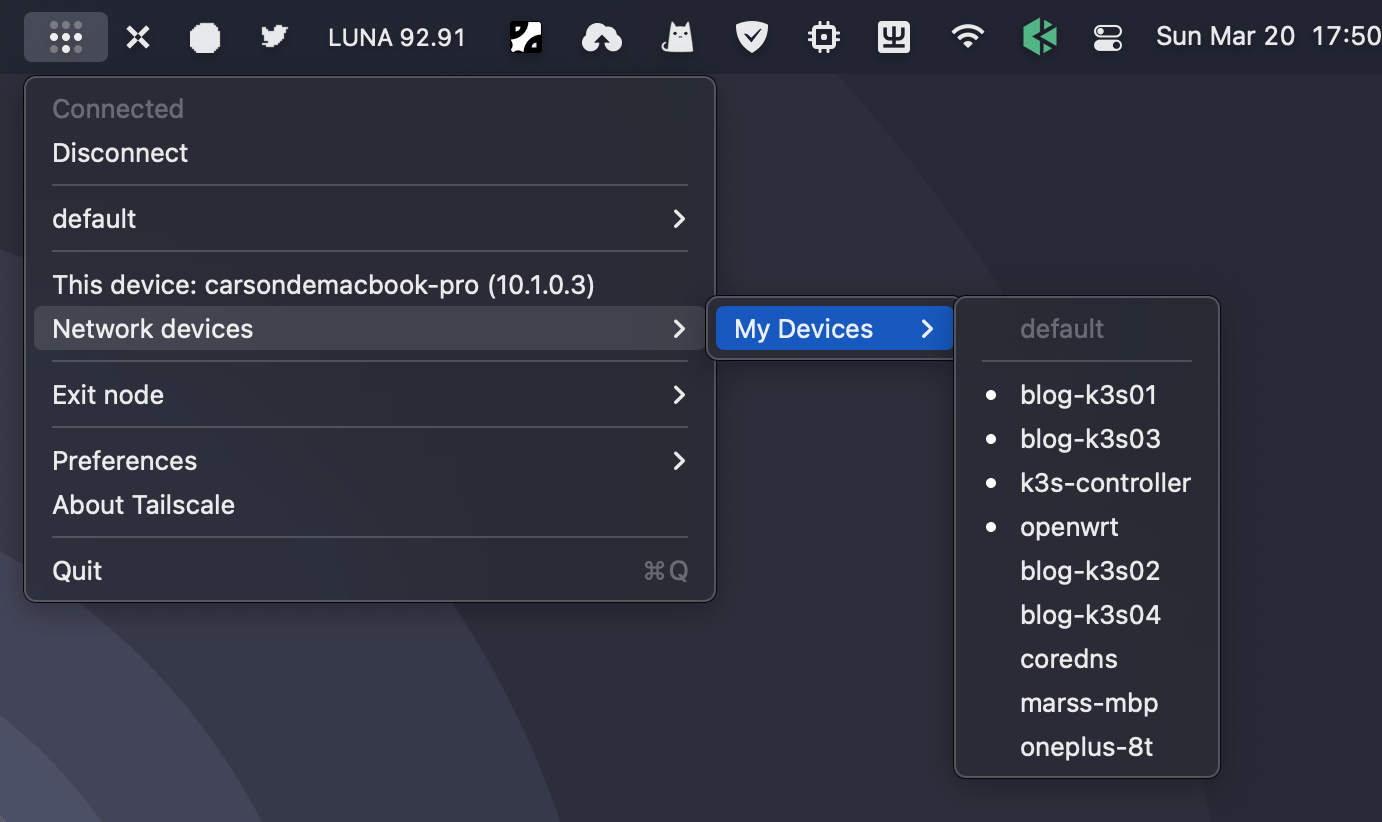
2 | carsondemacbook-pro | [k7bzX] | default | 100.64.0.2 | false | 2022-03-20 09:48:30 | online | no
On macOS, test connectivity with peer nodes:
$ ping -c 2 100.64.0.1
PING 100.64.0.1 (100.64.0.1): 56 data bytes
64 bytes from 100.64.0.1: icmp_seq=0 ttl=64 time=37.025 ms
64 bytes from 100.64.0.1: icmp_seq=1 ttl=64 time=38.181 ms

--- 100.64.0.1 ping statistics ---
2 packets transmitted, 2 packets received, 0.0% packet loss
round-trip min/avg/max/stddev = 37.025/37.603/38.181/0.578 ms
You can also employ the Tailscale CLI for this purpose:
$ /Applications/Tailscale.app/Contents/MacOS/Tailscale ping 100.64.0.1
pong from coredns (100.64.0.1) via xxxx:41641 in 36ms
For Tailscale clients version 1.32.0 or older, just follow the illustrated steps. No further elaboration is needed in this context.
Android#
As of version 1.30.0, Android users have the ability to personalize their control server, also known as the coordination server. The latest version can be downloaded from Google Play or F-Droid.
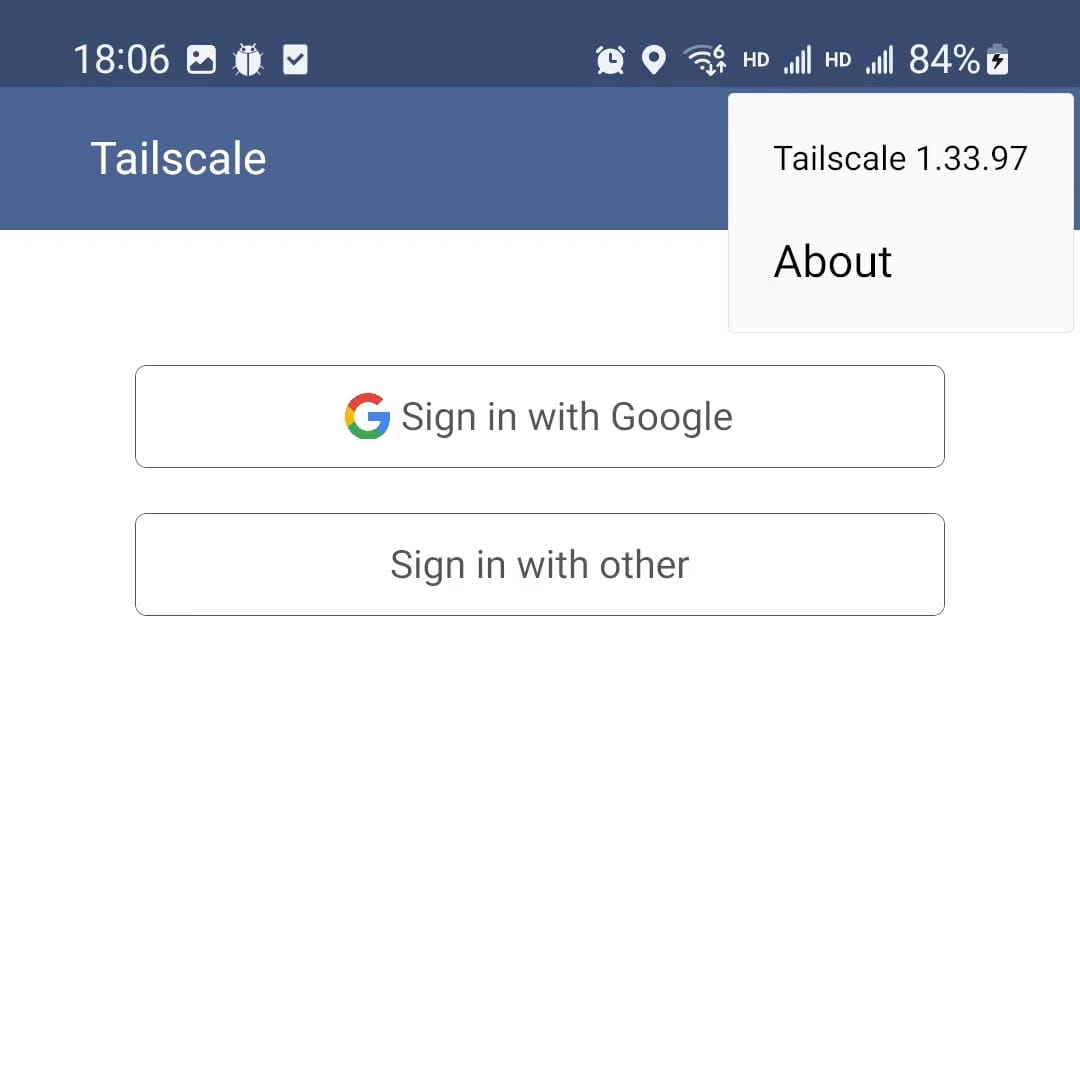
Upon completing the installation, opening the Tailscale App reveals this interface:
By tapping the “three dots” in the top right corner, initially, you’ll see only an About option:
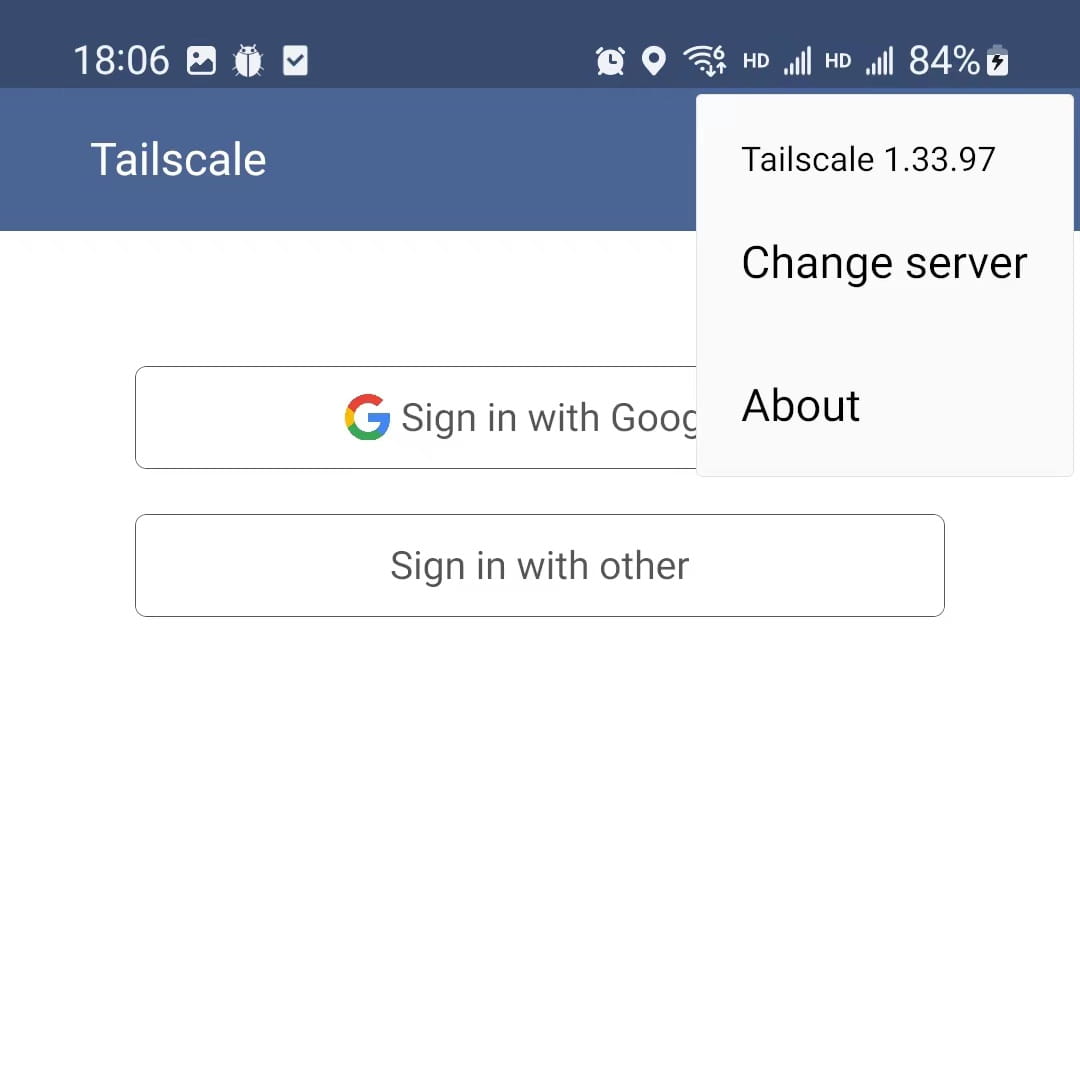
The next step involves a clever maneuver: continuously open and close the “three dots” menu in the top right. After repeating this several times, a new Change server option becomes available:
Click Change server and input the headscale control server’s address:
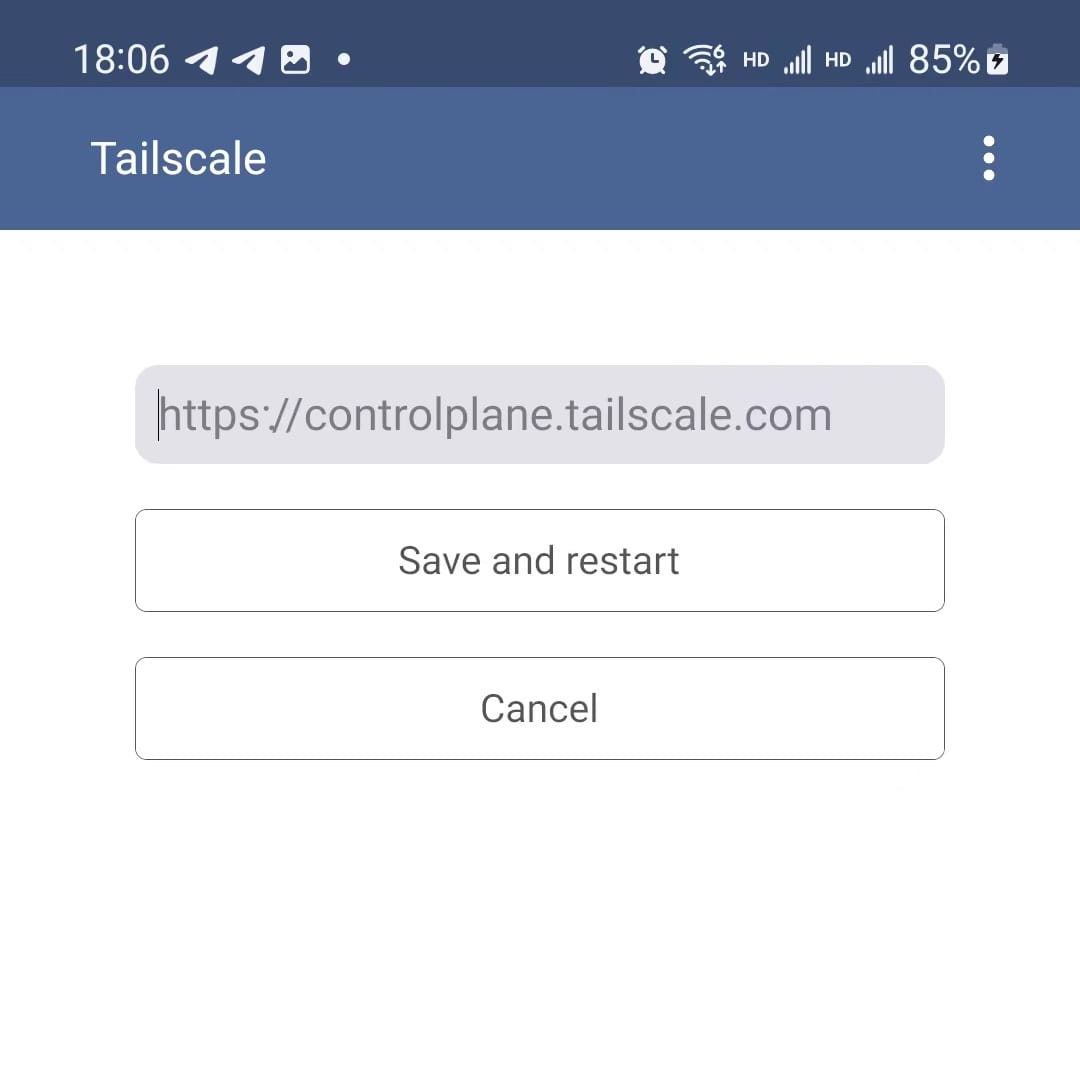
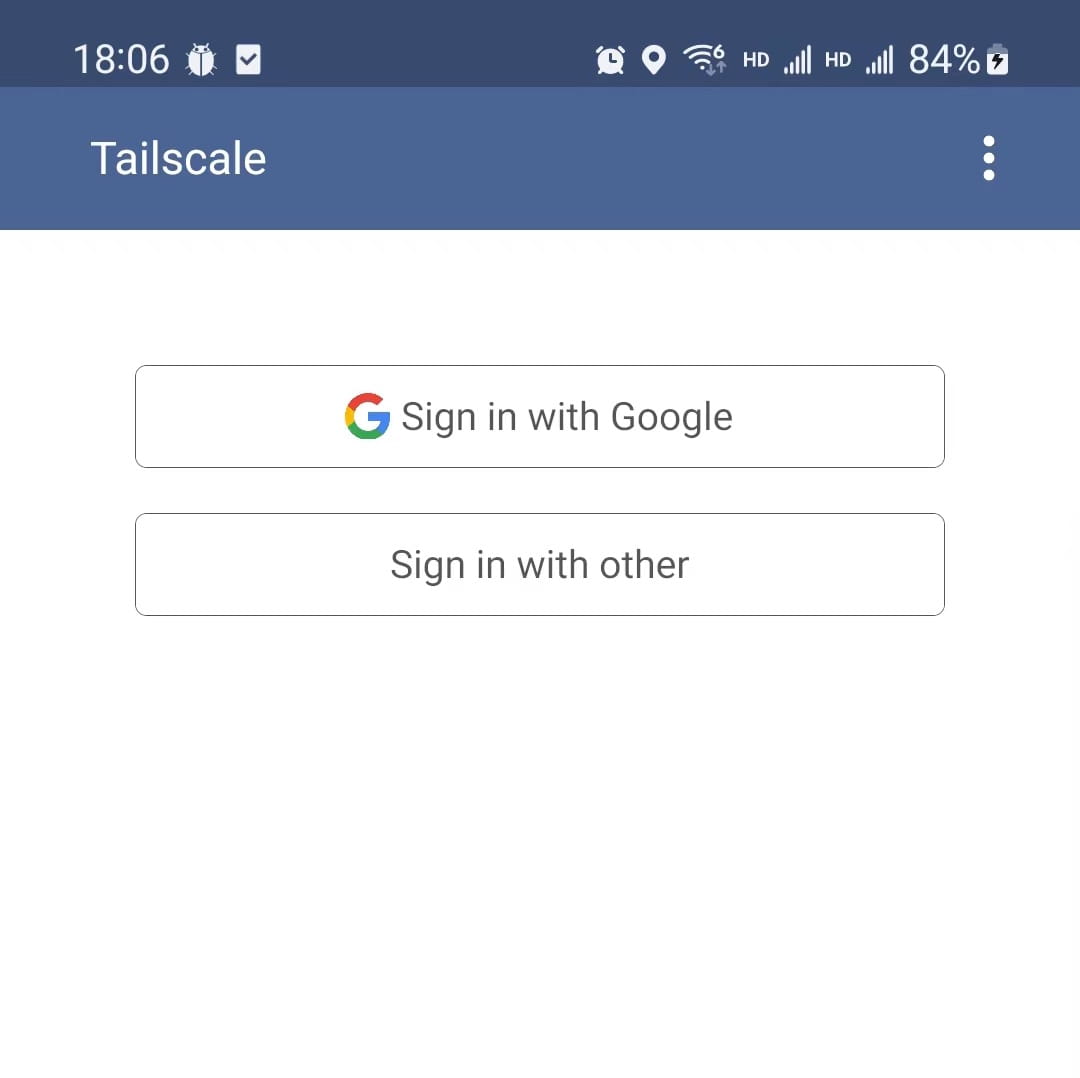
Then, select Save and restart. When you press Sign in with other, the following page will appear:

Transfer the command shown onto the terminal of your Headscale host, substituting USER with the user you had previously set up, then run the command. After a successful registration, close this page to return to the App’s main interface, as depicted in the image:

Windows#
To integrate Headscale as the control server with the Windows Tailscale client, simply open https://<HEADSCALE_PUB_ENDPOINT>/windows in your browser. This will lead you to an interface as shown below:
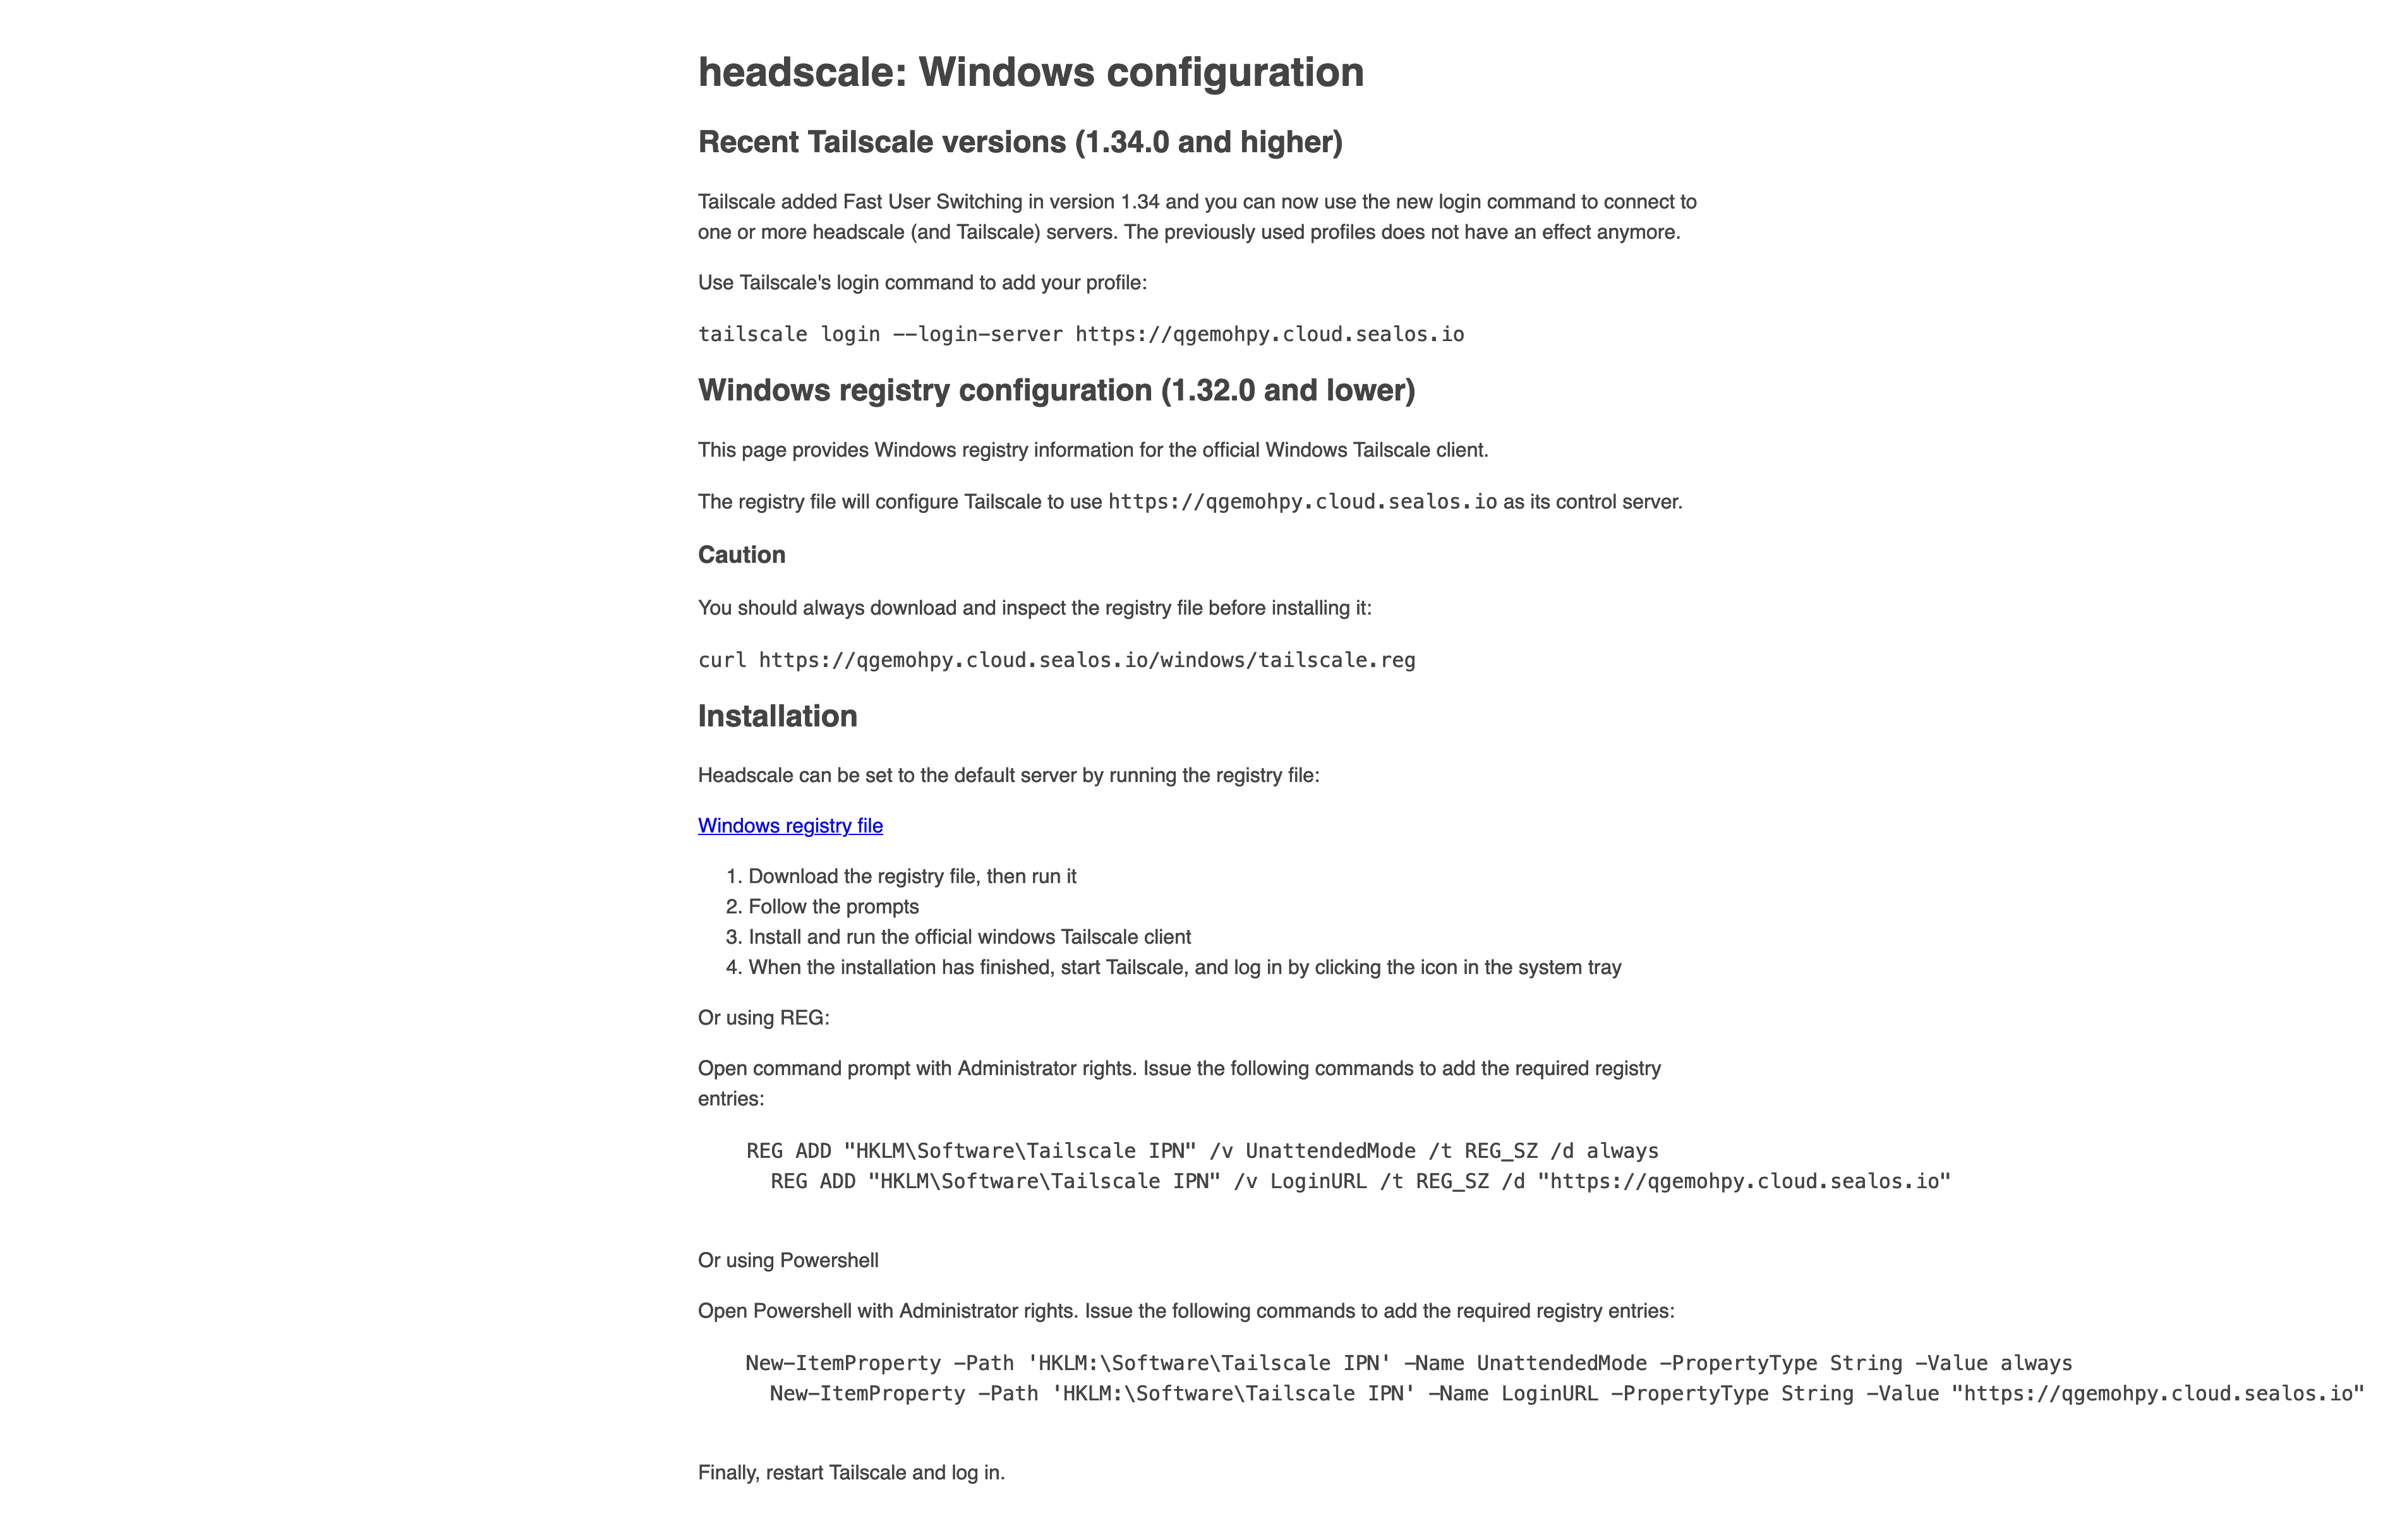
Follow the instructions outlined there to complete the setup.
Other Linux Distributions#
For Linux distributions used in specific scenarios like OpenWrt, QNAP, and Synology, the installation guides have already been prepared by others. Here, I will provide the links to these GitHub repositories for further reference. If you need to install on these platforms, please refer to the respective repository documentation.
- OpenWrt: https://github.com/adyanth/openwrt-tailscale-enabler
- Synology: https://github.com/tailscale/tailscale-synology
- QNAP: https://github.com/tailscale/tailscale-qpkg
iOS#
To install on iOS, simply download from the App Store, ensuring you have a U.S. region account ID.
After installing, open Tailscale to verify no accounts are currently logged in. Then head to “Settings”, scroll down to locate “Tailscale” below either “Game Center” or “TV Provider”, and click to access it.
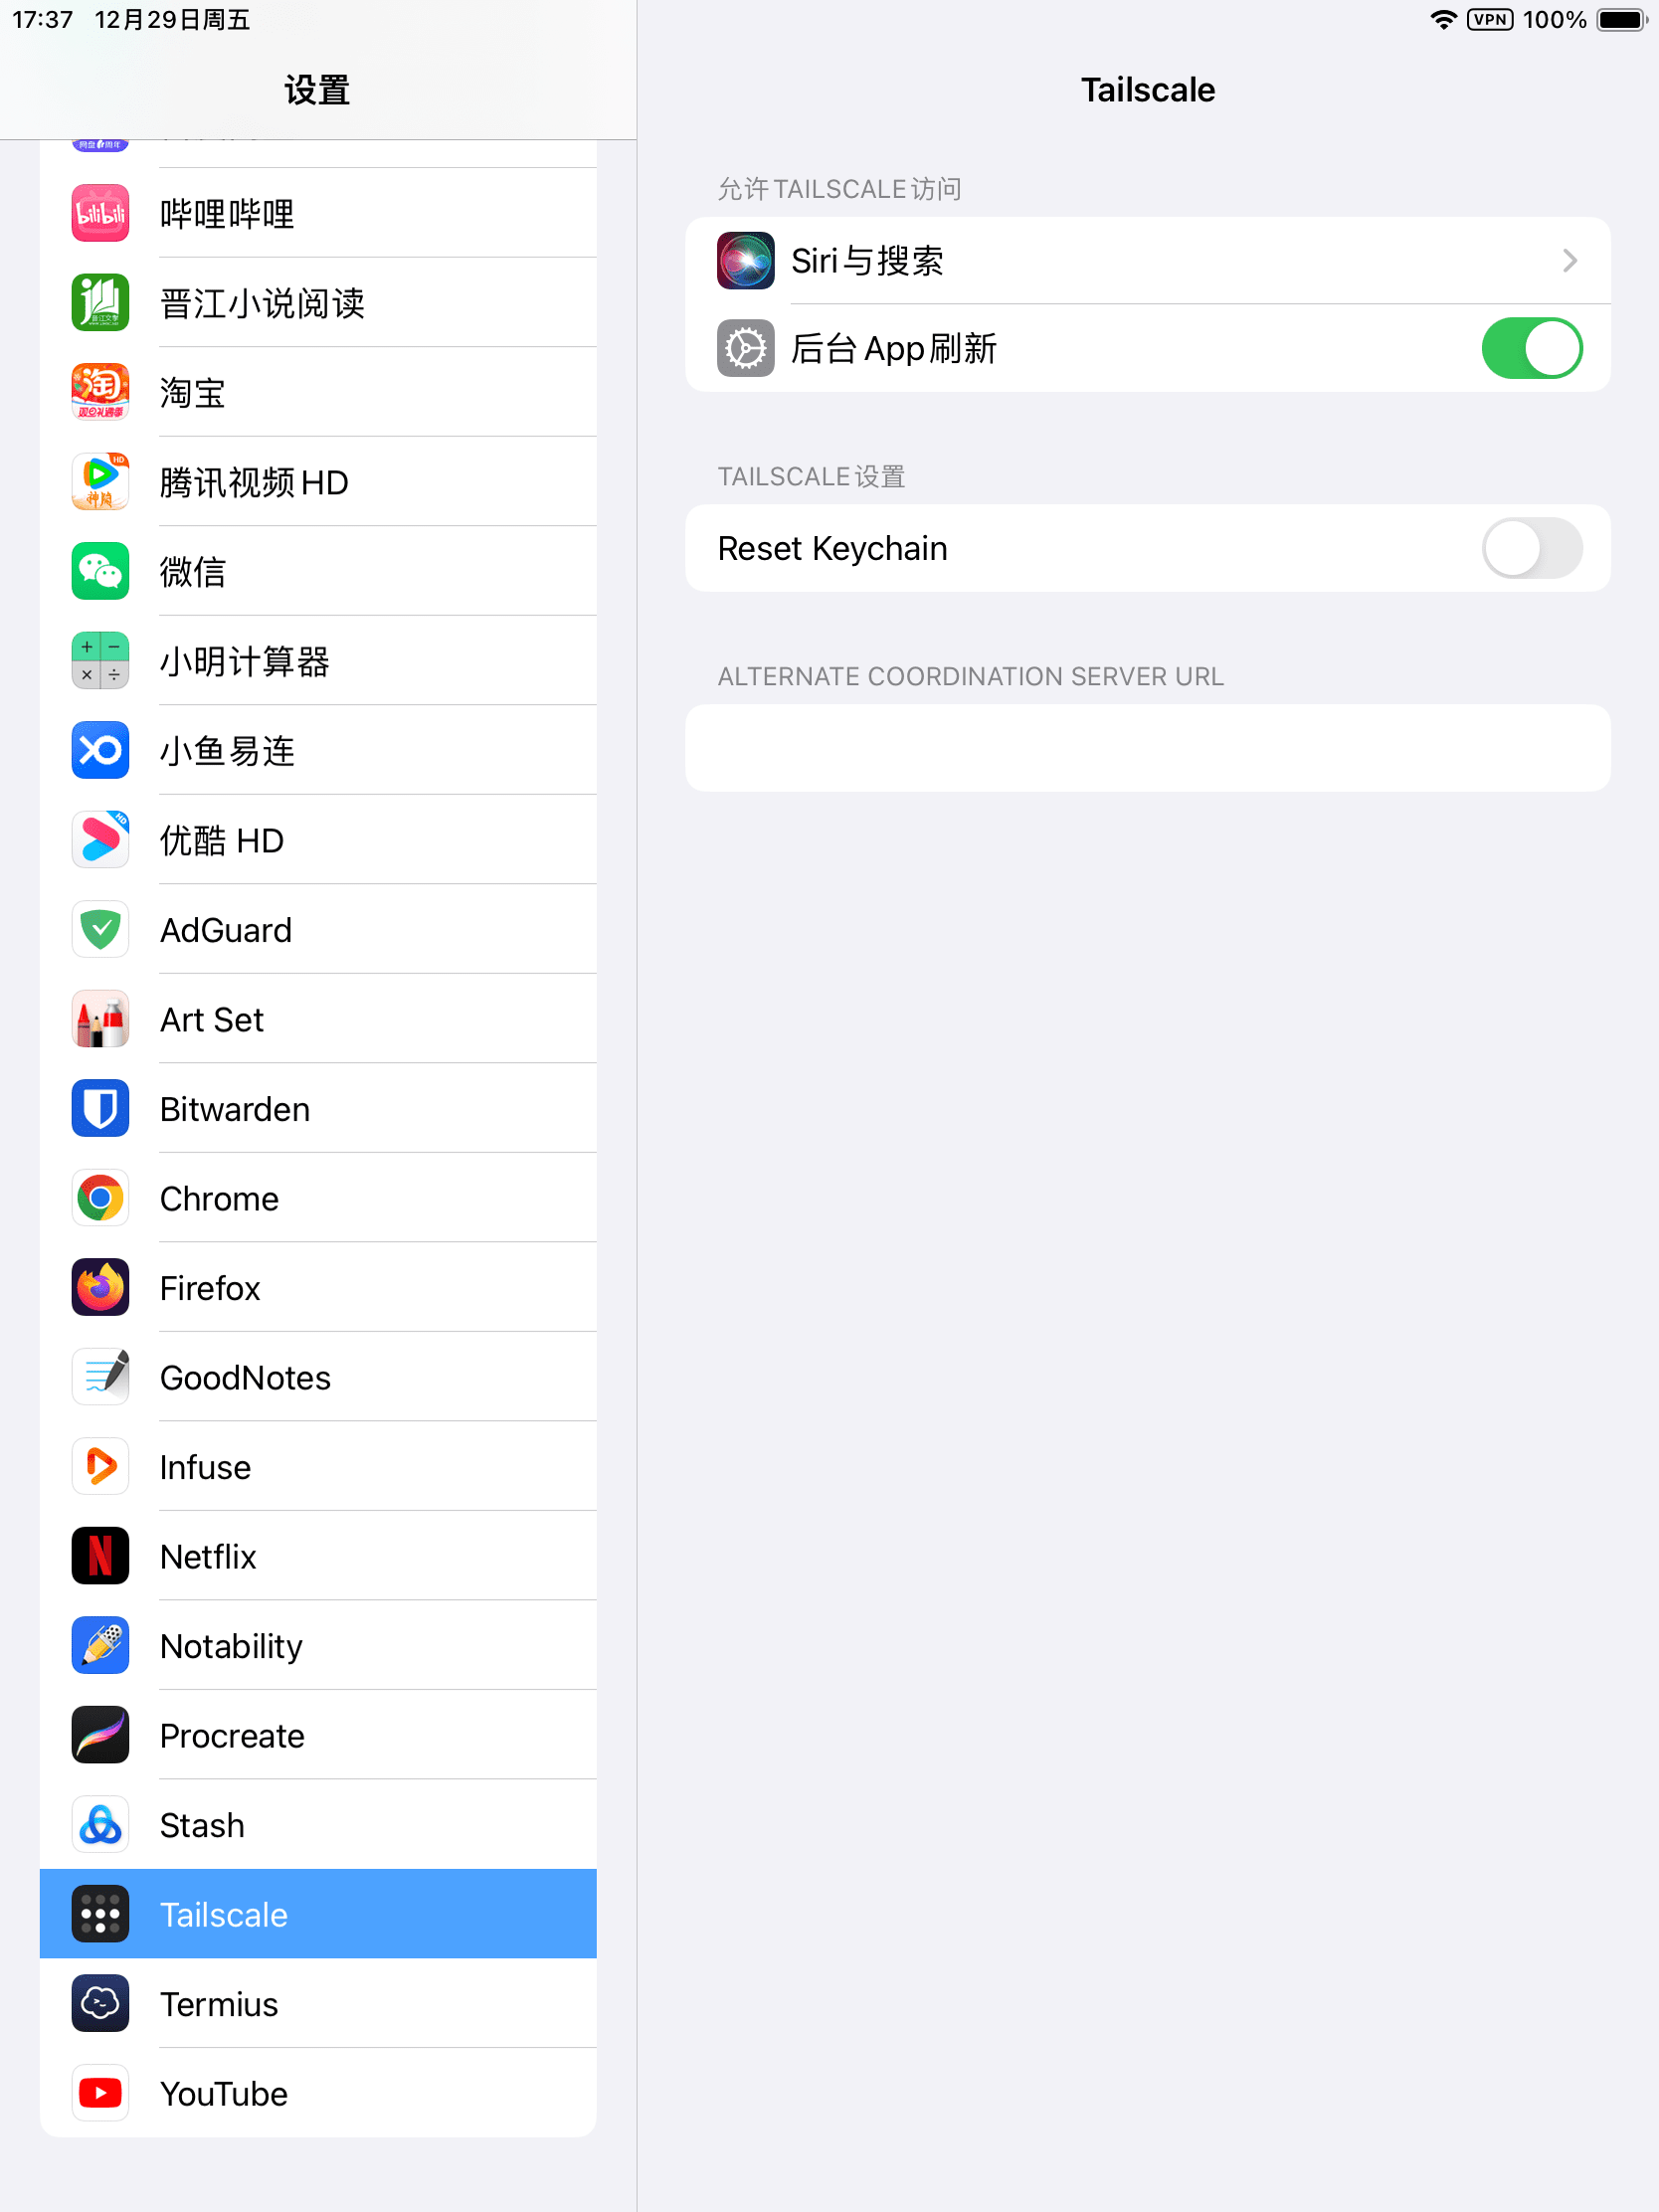
If your device has been connected to Tailscale server before, activate the “Reset Keychain” feature.
In the “Alternate Coordination Server URL” field, input your Headscale public domain name.
Close and reopen Tailscale via the iOS app switcher. Next, select “Log in” to trigger a Headscale authentication pop-up.
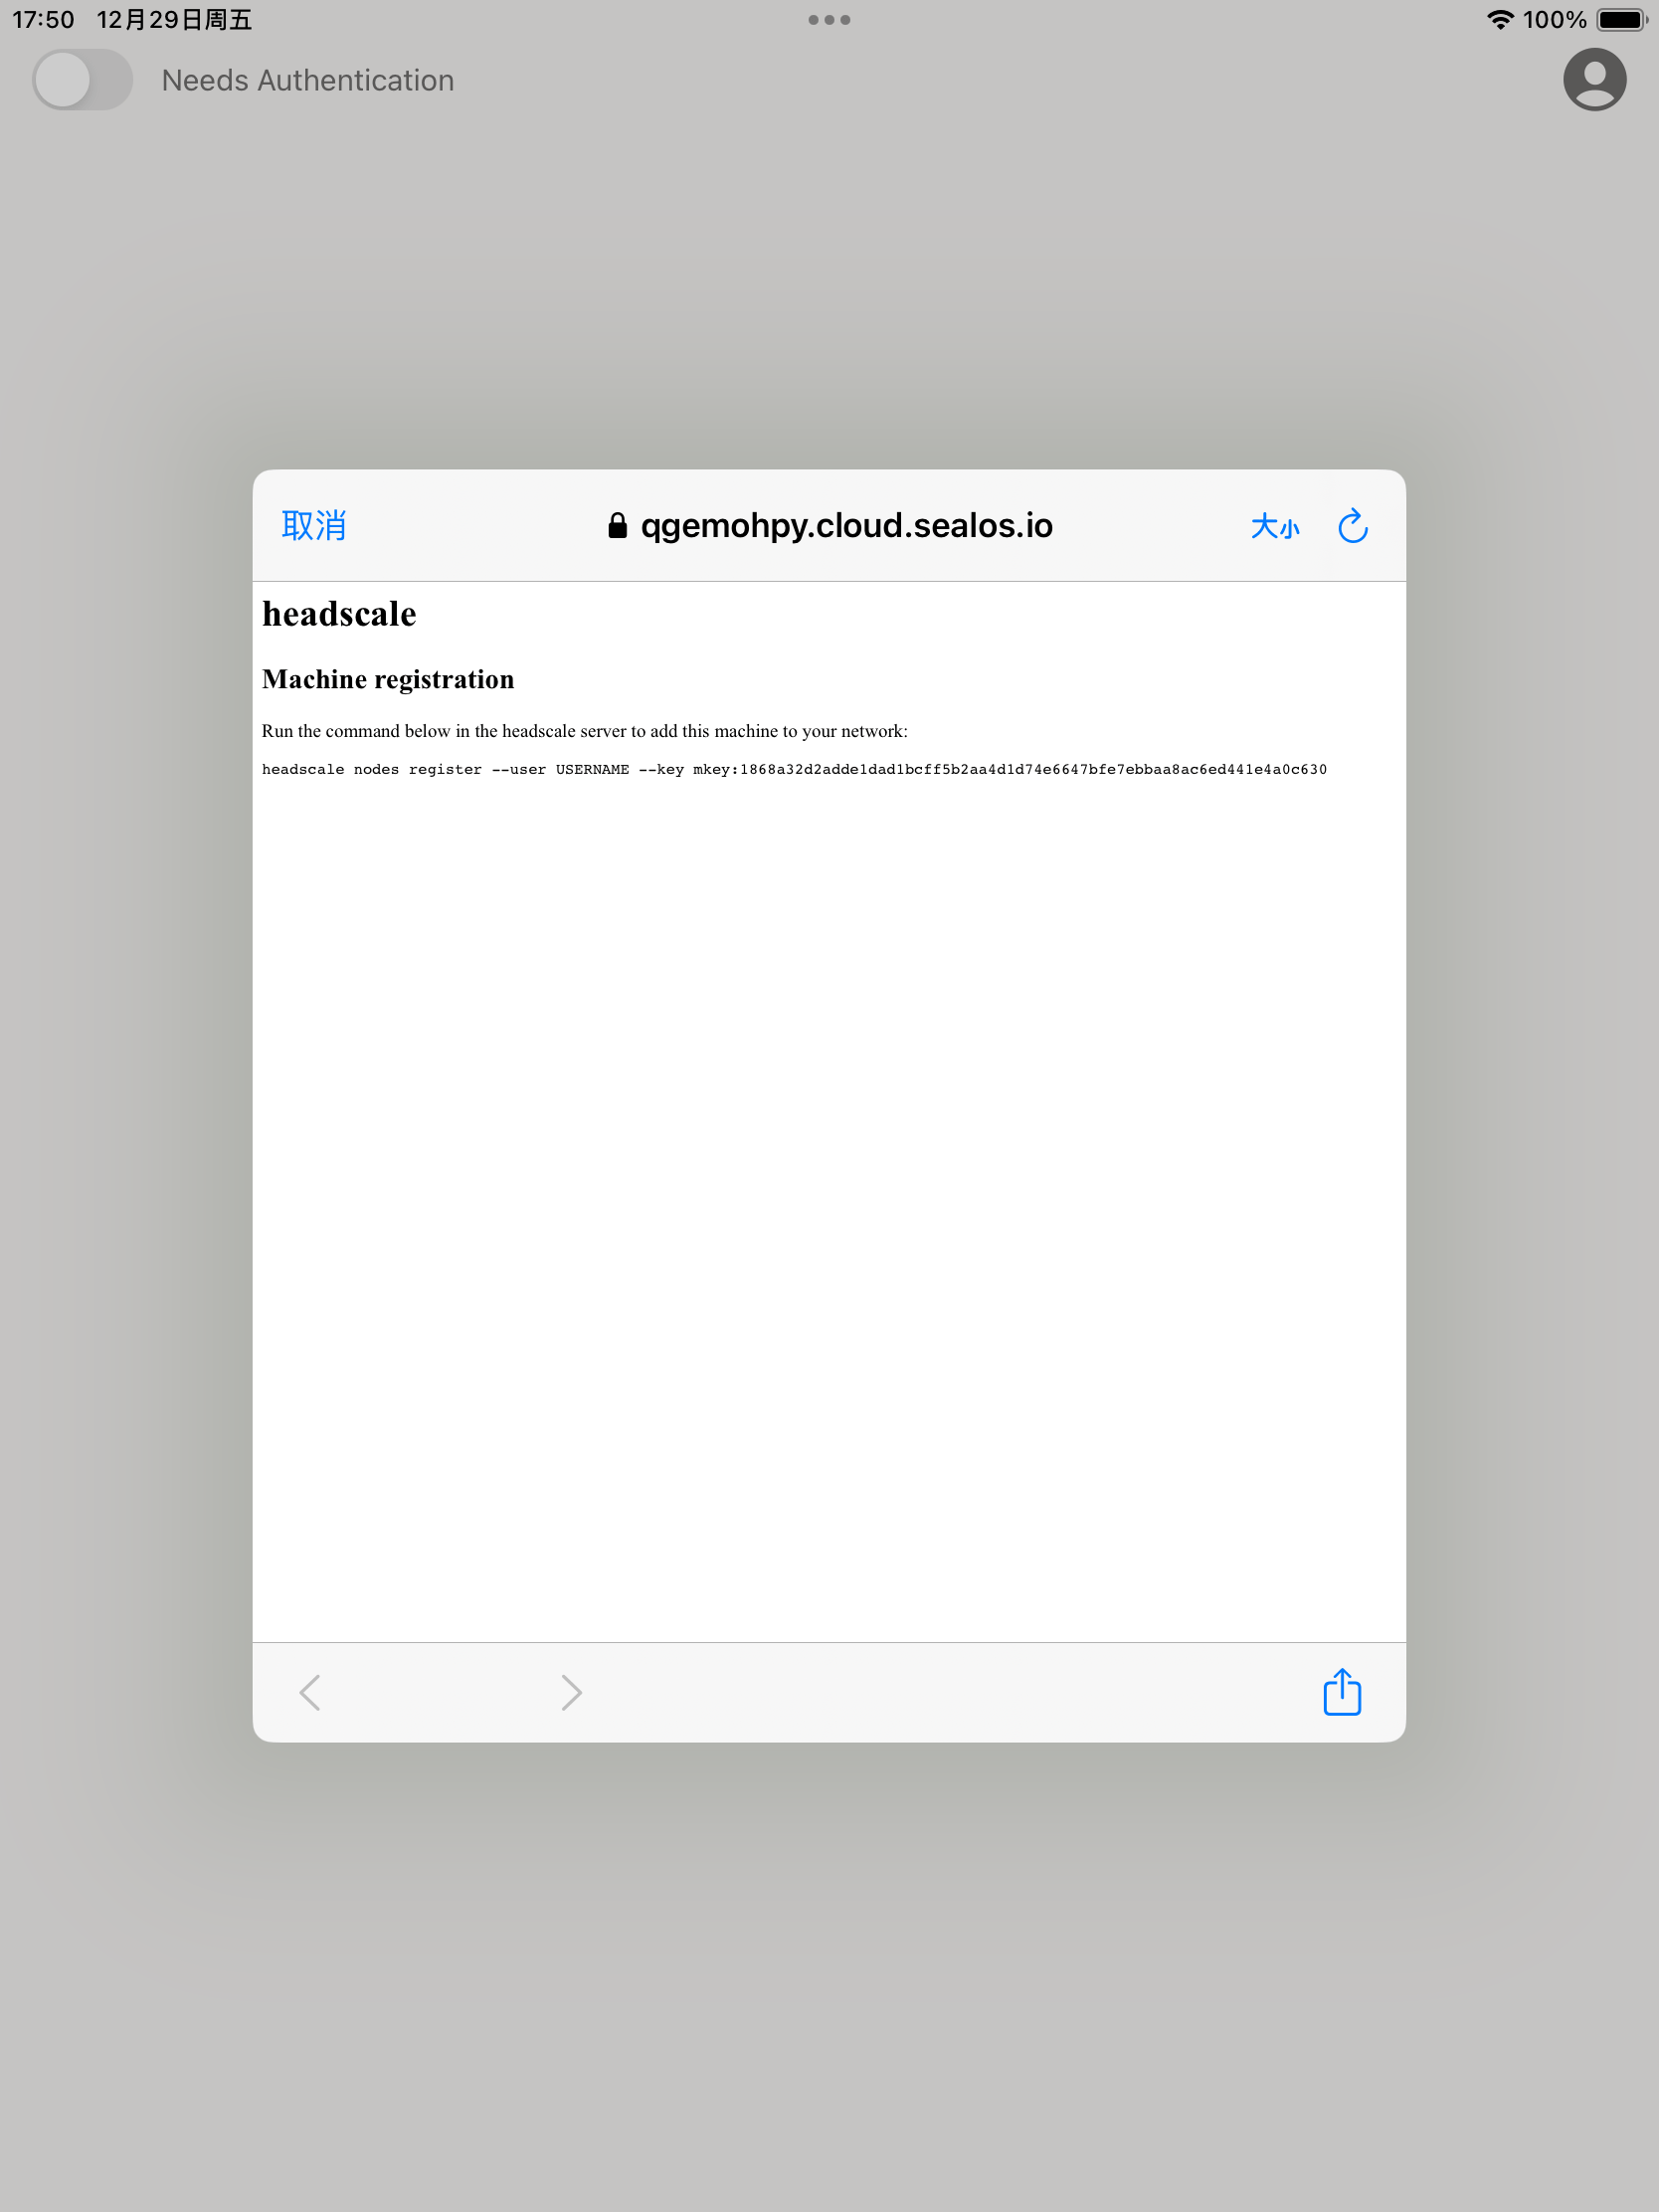
Copy the command from the Headscale authentication page and paste it into the terminal of your headscale container, replacing USERNAME with the user you previously created.
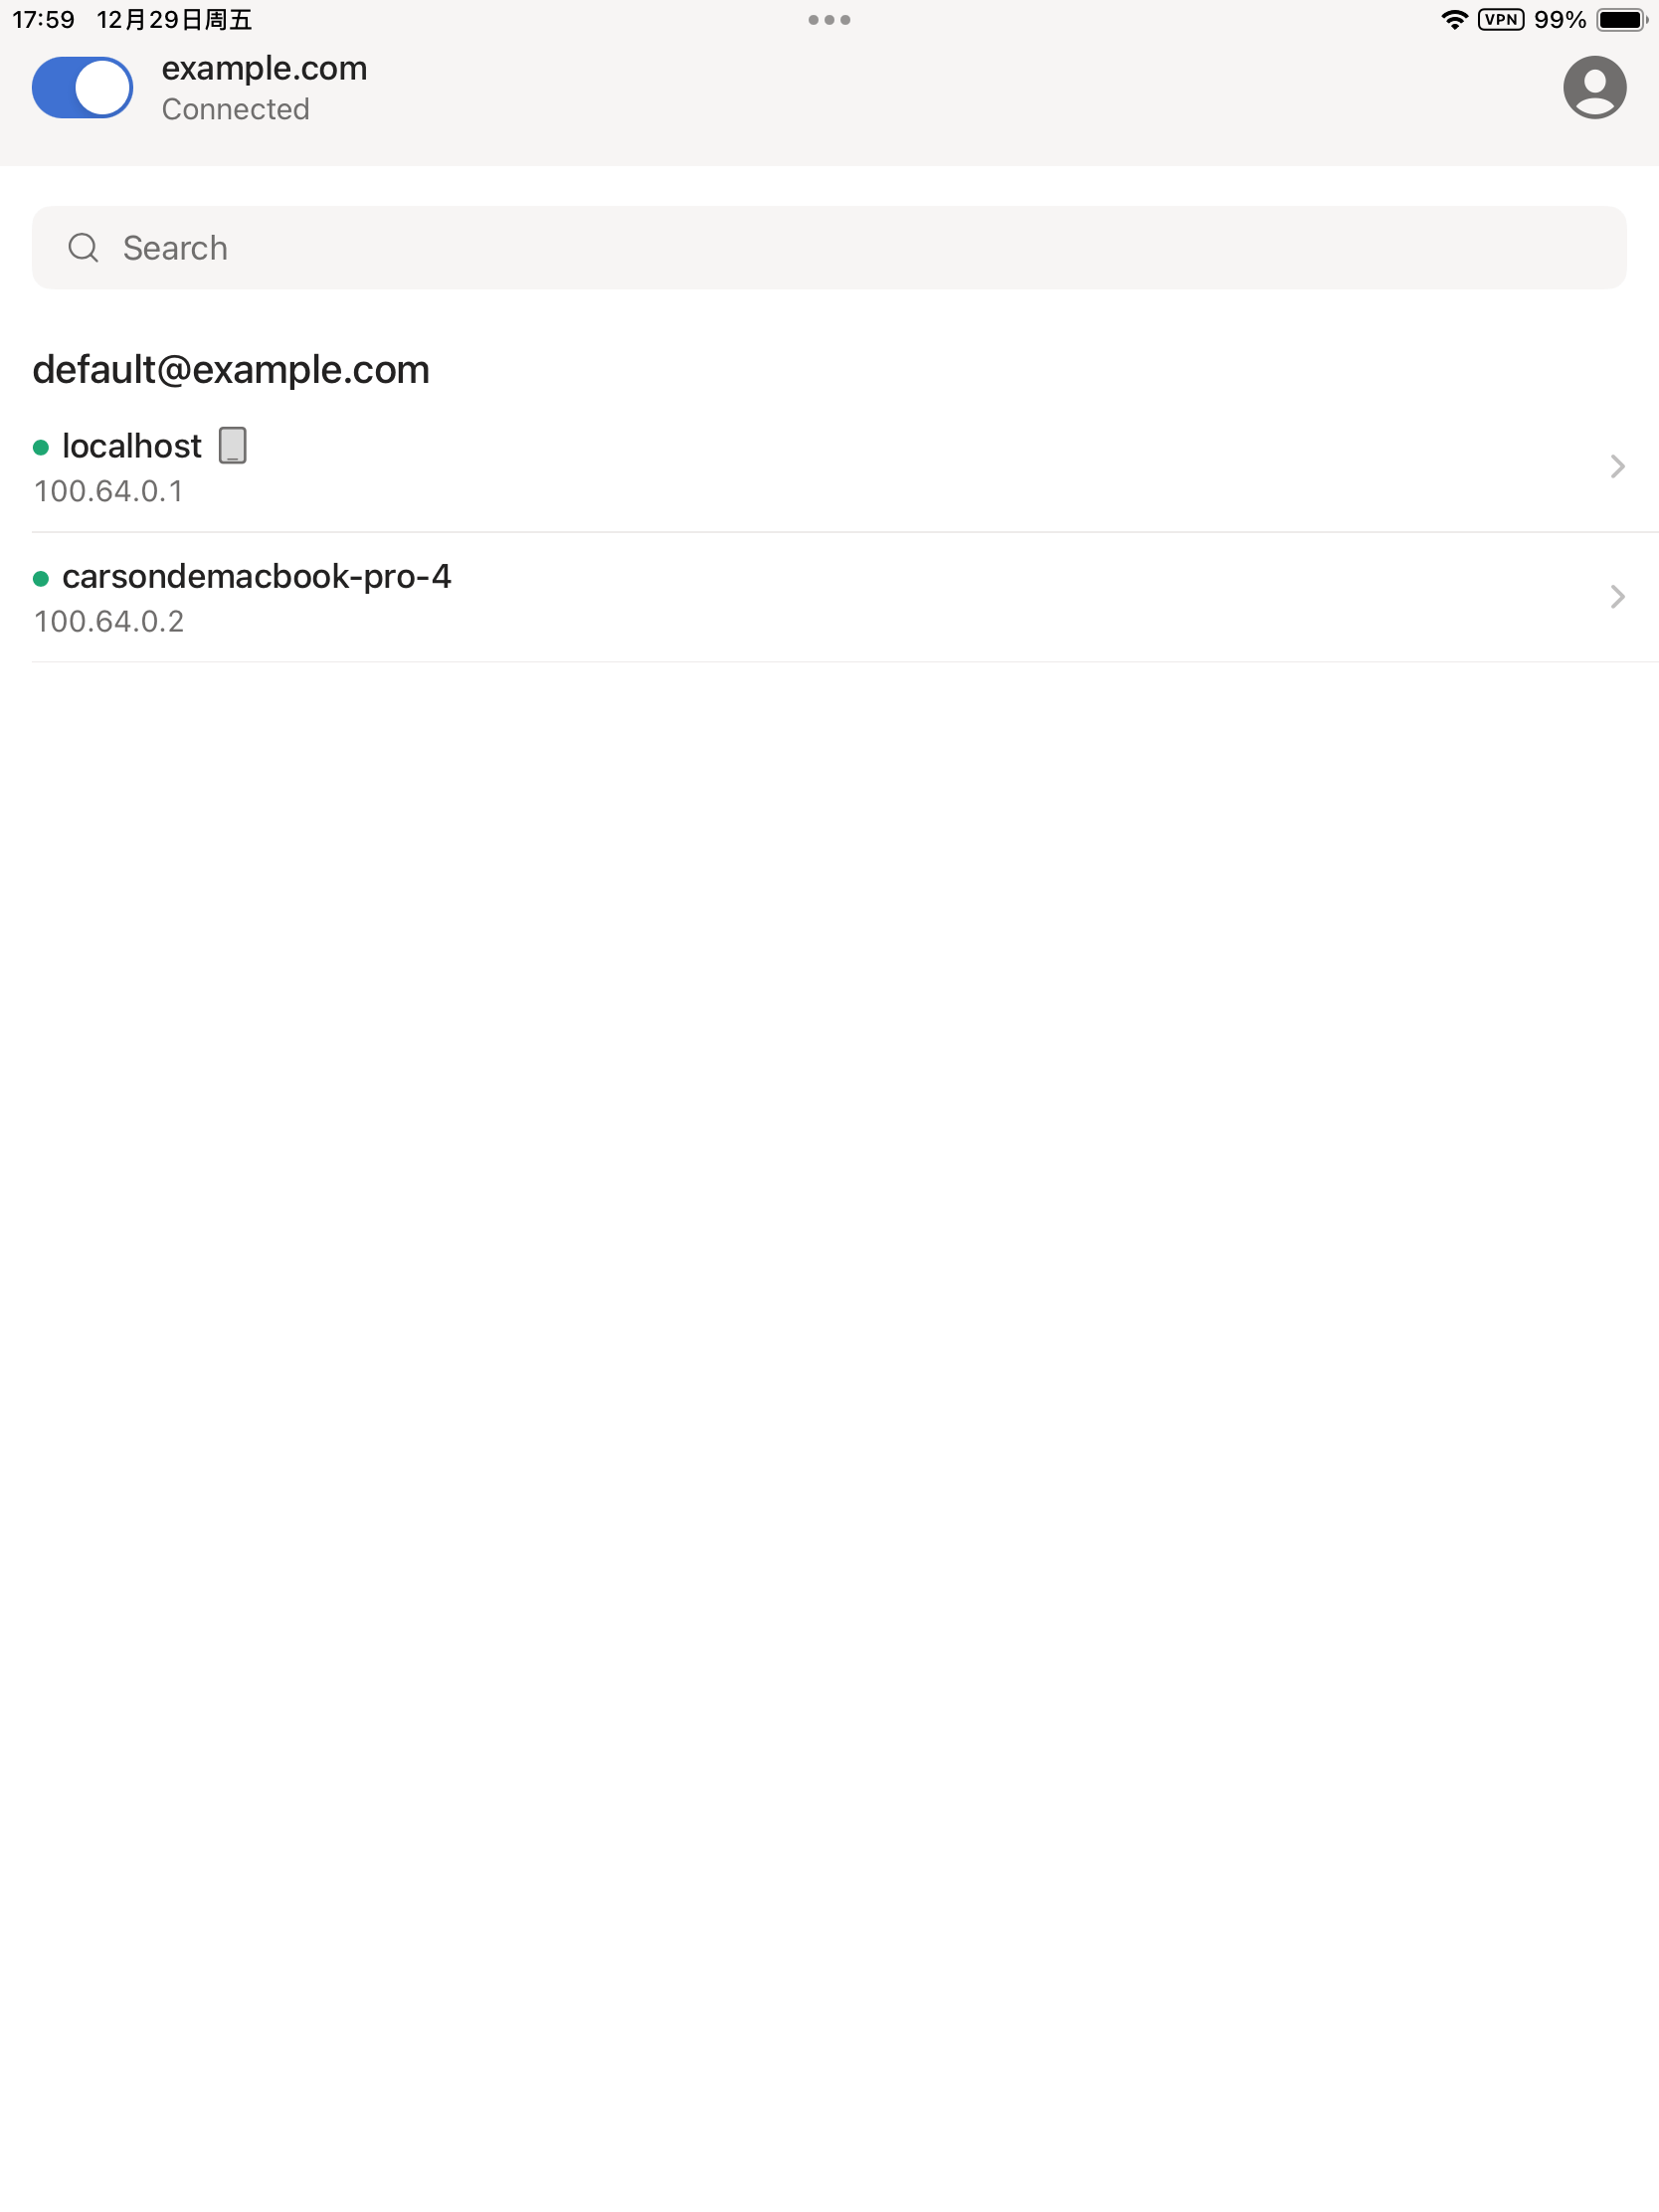
$ headscale nodes register --user default --key mkey:1fbd9696ebb03b9394033949514345bc5dba0e570bc0d778f15f92a02d2dcb66
2023-12-29T09:55:38Z TRC DNS configuration loaded dns_config={"Nameservers":["1.1.1.1"],"Proxied":true,"Resolvers":[{"Addr":"1.1.1.1"}]}
Node localhost registered
Successful registration is confirmed with a notification.
Effortless Access via Pre-Authkeys#
Bypassing the more cumbersome server approval methods of the past, this approach offers a seamless way to connect directly without waiting for server consent.
Begin by creating a pre-authkey token on the server. This token can be set to expire after 24 hours:
$ headscale preauthkeys create -e 24h --user default
To view the key you’ve created:
$ headscale --user default preauthkeys list
ID | Key                                              | Reusable | Ephemeral | Used  | Expiration          | Created
1  | 57e419c40e30b0dxxxxxxxf15562c18a8c6xxxx28ae76f57 | false    | false     | false | 2022-05-30 07:14:17 | 2022-05-29 07:14:17
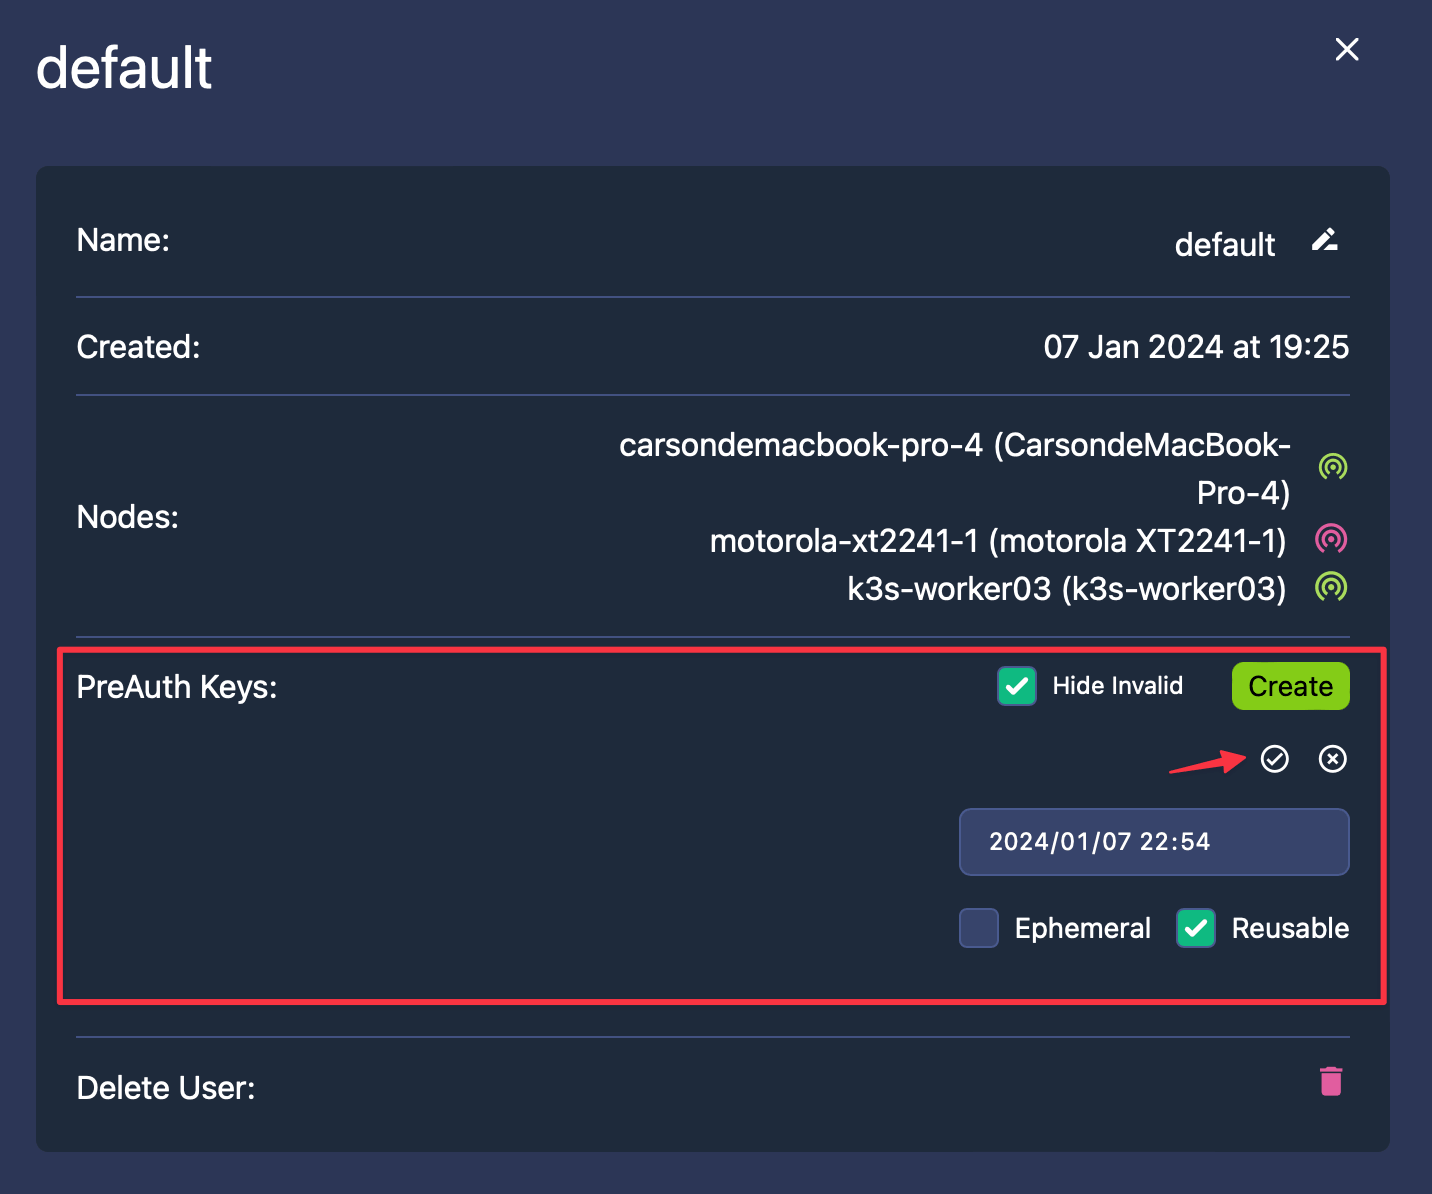
You can also generate this key using Headscale-Admin. Simply click on the desired User:
In the interface that appears, hit Create next to “PreAuth Keys,” set an expiration time (such as 100 years), tick Reusable if you plan to reuse this Key, and then click ✅:
After creation, copy the PreAuth Key by clicking the highlighted area in red:
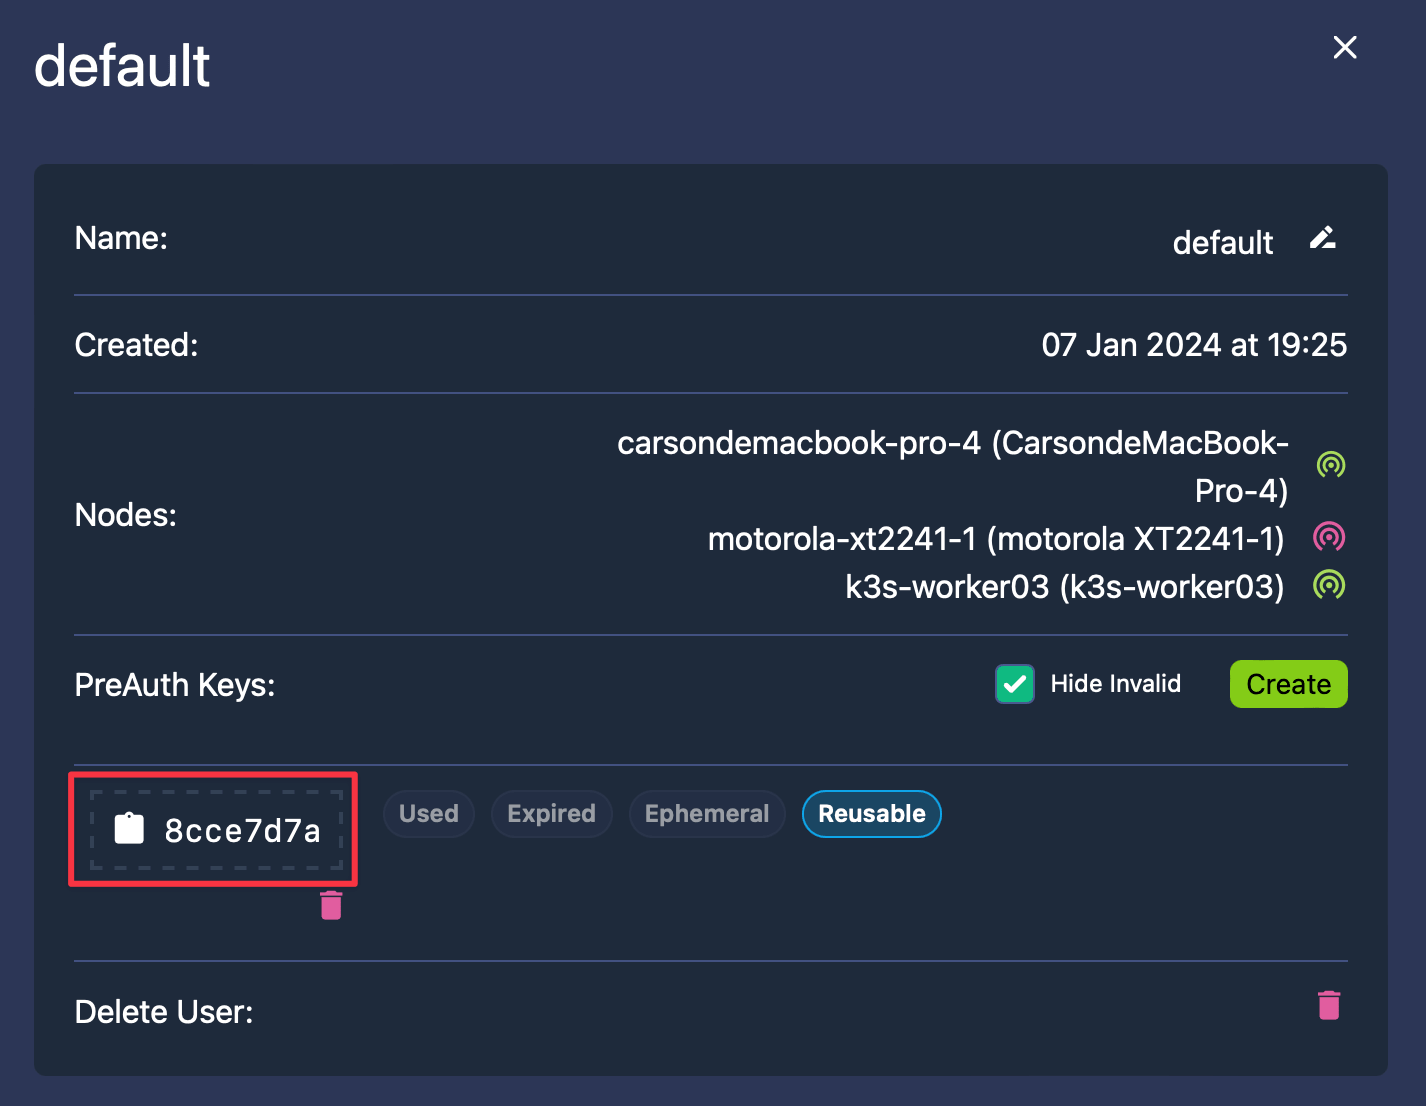
With this, new nodes can effortlessly connect directly, bypassing the need for server approval:
$ tailscale up --login-server=http://<HEADSCALE_PUB_ENDPOINT>:8080 --accept-routes=true --accept-dns=false --authkey $KEY
Integrating Local Area Networks#
Up to now, we’ve focused on constructing a point-to-point Mesh network, enabling nodes to connect directly through WireGuard’s private network IPs. However, we can aim higher. Recall our initial discussion about accessing in-home network resources? We have the capability to configure each node to access local area network IPs of other nodes. This functionality opens up numerous possibilities. For instance, you can access NAS systems on your home network or any internal network service. This can be particularly beneficial for advanced users who wish to access Pod IPs and Service IPs within Kubernetes clusters on cloud services.
Let’s say your home network includes a Linux device (such as OpenWrt) equipped with the Tailscale client. The goal is for other Tailscale clients to effortlessly access any device on your home network via its local area network IP, like 192.168.100.0/24.
The configuration process is straightforward. Your first step is to set up IPv4 and IPv6 routing:
$ echo 'net.ipv4.ip_forward = 1' | tee /etc/sysctl.d/ipforwarding.conf
$ echo 'net.ipv6.conf.all.forwarding = 1' | tee -a /etc/sysctl.d/ipforwarding.conf
$ sysctl -p /etc/sysctl.d/ipforwarding.conf
To modify the client command for updating registration nodes, add --advertise-routes=192.168.100.0/24 to the base command. This parameter signals the Headscale server that “this node can reroute to these specified addresses.”
$ tailscale up --login-server=http://<HEADSCALE_PUB_ENDPOINT>:8080 --accept-routes=true --accept-dns=false --advertise-routes=192.168.100.0/24 --reset
Checking the routes on the Headscale end reveals that these routes are initially disabled.
$ headscale nodes list|grep openwrt

6 | openwrt | [7LdVc] | default | 100.64.0.6 | false | 2022-03-20 15:50:46 | online | no

$ headscale routes list -i 6

Route | Enabled

192.168.100.0/24 | false
To enable a specific route:
$ headscale routes enable -i 6 -r "192.168.100.0/24"

Route | Enabled

192.168.100.0/24 | true
For activating multiple routes, use commas to separate them:
$ headscale routes enable -i 6 -r "192.168.100.0/24,xxxx"
To enable all routes at once, use the -a option:
$ headscale routes enable -i 6 -a
Other nodes can inspect the routing:
$ ip route show table 52|grep "192.168.100.0/24"
192.168.100.0/24 dev tailscale0
For these nodes to accept external routes, they must start with the --accept-routes=true option, indicating “I accept routes from other nodes.”
Now, from any Tailscale client node, you can ping any device within your home network, just as if you were there. Whether at the office or a cafe, you can easily access your home devices using the same IP address, offering remarkable convenience.
Summary#
As for stability, Tailscale currently holds a slight advantage over Netmaker. It typically avoids the intermittent connectivity issues that Netmaker encounters. This reliability is largely due to Tailscale’s sophisticated optimizations for NAT traversal in user-space. They’ve also authored an insightful article on the mechanics of NAT traversal, which comes highly recommended. Here’s an illustrative image for better understanding:
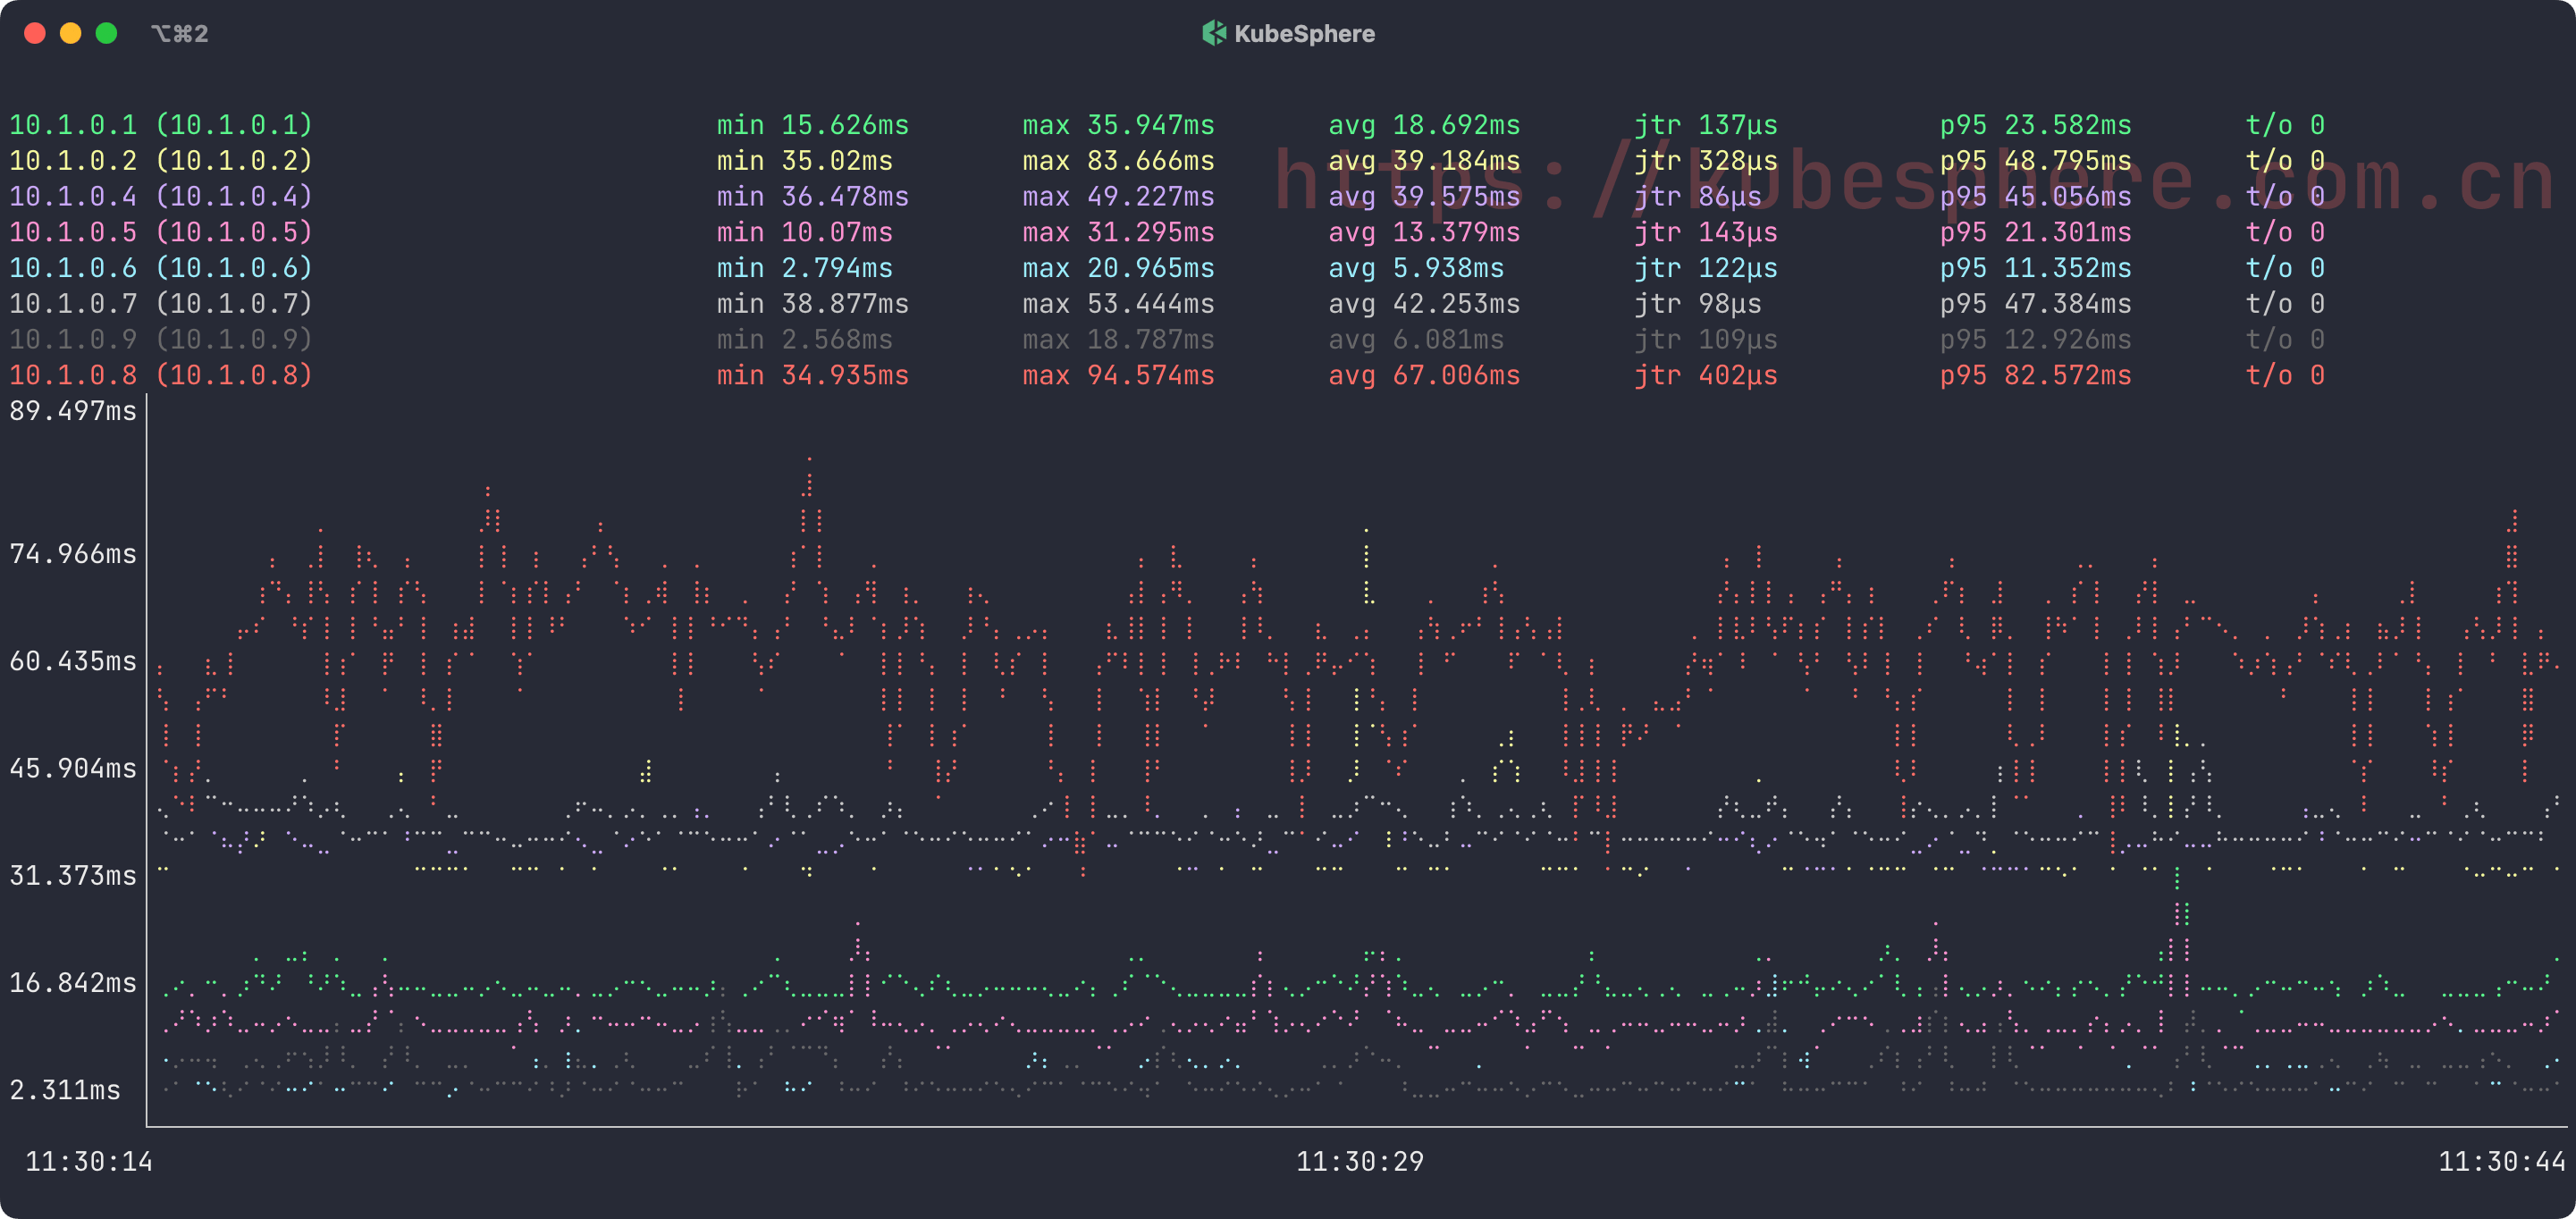
This piece introduces both Tailscale and Headscale, focusing on the installation and setup of Headscale, the integration with clients across various platforms, and the method to link local networks of different nodes. The subsequent article will delve into how to configure Tailscale to use custom DERP Servers (that is, relay servers). See you in the next one!